Experimenting with Modelling in Plasterboard

When casting with plaster you always have to contend with mould design, consistency of mixing the plaster and the eventual extraction from the mould. These factors can cause a fairly high fail rate if one or more are carried out incorrectly. One way we can get around the need to mould and cast slabs of plaster is to utilise a ready made substitute in the form of plasterboard. Pre-cast plaster board can be purchased readily and cheaply from most DIY stores. It provides a consistent slab of plaster that can be easily worked using hand tools or machine cutting.

5th Year Lost Spaces (5)

In its bought state plasterboard has a layer of paper adhered to the outside which can be removed using a wet cloth. This is the most laborious aspect of using this material but is a small price to pay for the time and expense of trying to cast slabs from scratch.

DSC05132

5th Year Lost Spaces (2)Once clean of paper the board should be left to thoroughly dry before being worked.

With this particular project slabs of plaster board were cut to size before being engraved with detailing on the laser cutter. This level of detail created a cast concrete imitation that would be very difficult to replicate from a cast piece.
5th Year Lost Spaces (15)The main disadvantage of this engraved method is in its fragility. Once completed the engraved pieces have to be held with great care to avoid damaging the surface. One method of strengthening the pieces is to spray over a layer of clear lacquer. Even with this coverage the surface can easily be damaged so this process is really for aesthetic purposes and doesn’t lend itself to models that need to be handled.

To create the impression of a solid cast block the edges of each piece were mitred prior to being engraved. Mitering the edges made for an even more fragile edge that required filling with a quick drying Poly-filla which was then lightly blended with sand paper.

Lost Spaces – Nine Elms Cold Store

Initial experiments with this method were done by George Thomson, Jilly Clifford and Ayo Karim as part of the 5th year Lost Spaces workshop brief. Their project was focussed on the Nine Elms Cold Store.

“The choice of using a plasterboard method of construction was derived from our aim to have a scaled model which reflected the materiality of the Nine Elm’s cold store. The cold store was a prominent concrete landmark alongside the River Thames in the 1970’s with no apparent human scale; its only characteristic to the outside world was a repetitive façade detail wrapping the entirety of the building – something we successfully represented on the plasterboard model and by using the laser cutter.”

Nine Elms Cold Store (13) Nine Elms Cold Store (15) Nine Elms Cold Store (25)

Bollington Mill Project – Continuity in Architecture

Following on from this project Continuity in Architecture students Robbie Stanton, Sam Stone and Jahan Ojaghi chose to experiment using the same method to represent a derelict Mill in Bollington.5th year Bollington Mill (3)

Robbie Stanton explains the project:

Our initial research into Bollington exposed the town’s rich industrial heritage and emphasised the hugely influential role cotton manufacture has played in defining physical environment and local history and culture. However, many mill structures – the powerful emblems of a rich, multi-faceted past – have been lost. As a consequence, the physical townscape seems disconnected from its socio-historical context. The installation proposes a recognition of the lost forms of Ingersley Vale Mill, one such site at risk of being demolished and forming a further void in Bollington’s continual identity. By artificially lighting the ‘ghost’ structure we aim to draw attention back to a lost icon, re-stitching the building into the wider industrial fabric of Bollington. Continuity in Architecture 5th years were running a competition for a live installation on our site. This project is one of the short-listed 6 and basically proposed artificially lighting the ghost forms of a derelict mill using electroluminescent wire. We chose to try laser etched plasterboard because we wanted a model which could appear highly textured and lends itself to the decaying qualities of a ruin. A combination of CAD and hand scratching / editing were used to get a varied result.”

In addition to the laser engraved plasterboards the group used polly-filla to marry the land mass of the site with the walls of the building.

5th year Bollington Mill (7) 5th year Bollington Mill (8)5th year Bollington Mill (9)

The finished effect, as with the Nine Elmes Cold Cold Store Project is fantastic at capturing the rustic look of the building. It worth noting that this technique can be time consuming and the resulting pieces are very fragile so certainly don’t suit anything intended to be handled. North close up presentation photo south agled perspective

Plaster Casting guide inspired by Timothy Richards Models

Earlier this year myself and Jim went on a visit to Timothy Richards workshop in Bath. Read more about that visit here.

In response to what we saw there we decided to have a go at casting some facade tests of our own to demonstrate to you the potential when using this method for modelmaking. Starting with some reference images of the University of Manchester Archway we decided to focus on one of the Gothic style windows as our subject.

Making a ‘Master’

Initially recreating the form of this stone work in miniature may seem time consuming but as you will see the end results are fantastic and the intricate detail featured is easily replicated by casting.

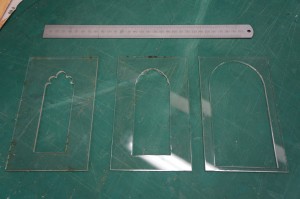
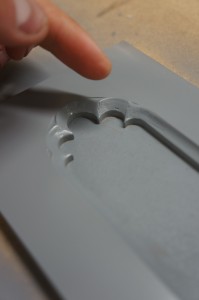
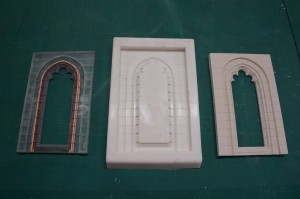
A good way of creating details like this is by layering sheet material, in this case acrylic. Planning the layers on CAD will allow you to break down the details into manageable  stages (Above). When combined, the layers of laser cut acrylic form the recesses and steps in the winder with the radius in the stone work being replicated using a filler and hand sanding (Below).

Spraying a coat of primer paint on hand finished areas can help to identify any imperfections in the surface (Below). This primer can then be sanded back

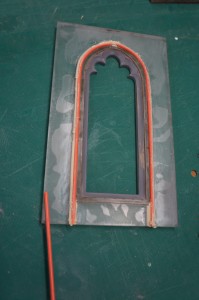
The extra details of the window can be formed using styrene and or abs strip with any further radius being creating again with filler. Once complete the master model is ready to be moulded. 

 Pouring a Silicone Mould 

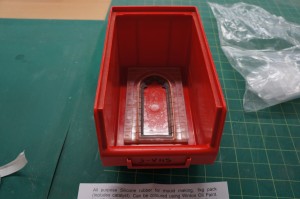
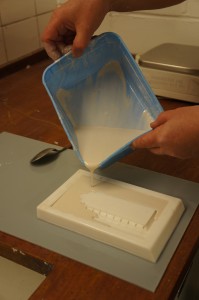
The are a wide range of silicone’s available for mould making so it is always advisable to check the specification of individual products before committing to use them on your master model. Firstly ensure the master is secured to a mould former – in this case we used a storage try which suited but bespoke formers are usually required.

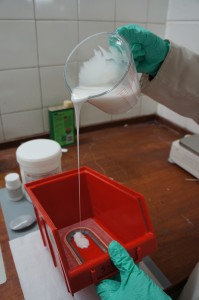
Ensure the silicone is mixed to the manufacturers instructions and pour in a thin stream to avoid any air bubbles forming against the master mould. Ensure the master is sufficiently covered and allow to cure for the recommended time.

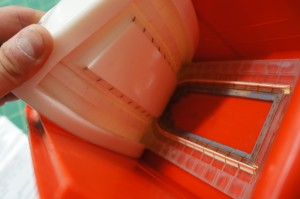
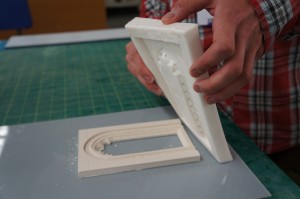
Once cured carefully remove the silicone mould preserving the master mould to be reused if any problems occur. The benefit of using silicone is that the flex allows the master and eventually cast items to be easily removed without much stain on the items themselves.  Some minor trimming of silicone overlap may be required before the mould is ready to be used for plaster casting.Plaster Casting

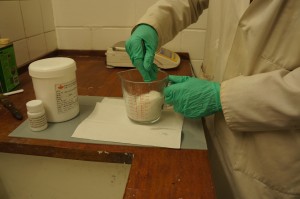
As with the silicone there are many types of plaster available so always check to see if the specification suits your needs. In this case we simply used stone plaster mixed to the correct consistency and poured directly into the silicone mould – no release agent required.

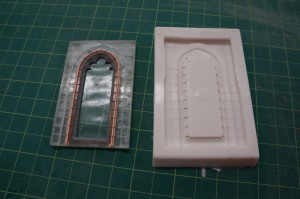
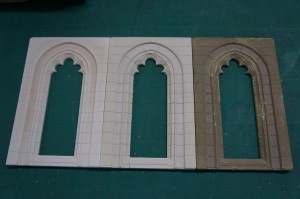
Once the plaster has set it can be carefully removed from the mould giving a completed cast. These sections can be used as tests or replicated to create a more detailed facade. 

One area we have touched on is adding pigments to the plaster mix to give varied results in terms of finished cast colouring. We will revisit this area when we have time to experiment some more and let you know how it goes. If you have any ideas that could make use of this method of making be sure to get in touch either via email or in person at the workshop. We are more than happy to help! Scott & Jim


Timothy Richards: Fine Plaster Architectural Models, Bath

Last week we took some annual leave to go on a modelmaking road trip! We visited two main locations and so I’ll split this summary into two posts. This post will cover our visit to Timothy Richards studio in Bath.

The company has become the world leader in the production of fine plaster cast architectural models for exhibition display and private commission.

Over the past few months there have been several student projects attempting to delve into the plaster casting medium to convey their ideas.Whilst we have some experience of this process we thought it would be useful to ourselves and to upcoming students to give an insight into this process commercially and how better than to visit this master of the art!

A friend of mine, Lauren Milton, with whom I graduated in Modelmaking is now working for Tim and was able to give us an extensive private tour and insight into the workings of the company. Tim’s models range from complete buildings to facade’s and architectural details. Many of these models are made to order as private commissions however there is a range of popular works which are kept in stock for purchase.

The method used to produce the models has been refined over time but essentially involves creating a ‘master’ form of the subject to take a mould from then casting in the appropriate coloured plaster which can be pigmented to suit. One of Tim’s core beliefs about model building is that a model should be as similar in materiality as the building it represents. This means that all of the works produced here are cast in their final colour and therefore no paint is used on the cast surfaces. The only areas where colour may be applied is again through a ‘raw finish’ material such as thin sheet metal used to emboss over certain areas much as they would be in reality on roofing details etc.

Once cast, the building or facade components are assembled and any additional details such as window frames and railing are added. These details are primarily made from etched brass – a process we will cover in another post but in the mean time please ask myself or Jim for more information.  The resulting components can be made extremely fine and add a great deal of realism to these models.

Finely sculpted elements are made by sculptors who are paid to create exact replicas of organic details on the buildings. Once complete the scaled down sculpts are cast in white metals and then added to the master models before being cast into the final model.

Tim keeps everything for future reference meaning an extensive store of past model masters and moulds. This area in particular is fascinating and shows the breadth of experience compiled through sheer number of past projects in store. This visit was truly fascinating and insightful. It may be possible for us to arrange a lecture and demonstration from Tim this coming academic year. Should this happen I can’t recommend it enough!

For more on Tim’s work click here: http://www.timothyrichards.com/

Outside of our workshop visit we spent some time looking around Bath looking at some of its fantastic architecture and the historic Roman Bath house. All in all a great place to visit should you get the chance!

Taking from our visit we have decided to have a go at creating some plaster models of our own so we’ll keep you updated on our progress with that in the coming weeks.

Scott