‘Peacock Museum’ 1:50 Cross Section Model by Mahishini Vasudevn

DSC04037

In another First Year case study we asked Mahishini Vasudevn to tell us about her recently completed project for the ‘Resolution’ brief:

“For our first project, habitat, I chose Peacock as my animal client so I made a design that would stand proudly and attract the eyes of the people just like the Peacock would do. To portray this, my design had a cantilevered floor which protrudes over the pavement of my site in Charles Street. The facade was designed to have stained glass which had the same colours as the peacock. In my design I have mainly focused on grasping the attention of people instantaneously.

In order to convey the most information about my design, I made a sectional model to give an insight to the structural aspects and the interior detailing of the design like the cantilevered stairs and the circulation around the building.

DSC04091

In the case of materials, for the glass facade I have used coloured acrylic as it best represents the colour and transparency that is implied in my design.  As for the columns, beams and floor joists I used Styrene H-columns which were sprayed in black to represent steel frames. The floors were made with MDF wood to replicate the wooden floors. The pathway with granite paving slabs was laser engraved on grey card to show the colour and the small amount of texture that I wanted to show. The interior was done with wood and acrylic. In my model I have tried my best to produce them in such a way that they almost represent the same materials that would be used in reality if it were to be built.

DSC04135

Through making this model I have learnt new techniques of model making. It has taught me more about my design like the structural connections and how a design comes together as I was able to have a 3D view of my design. I’ve learnt how to plan my work and handle time with care.

Model making has been the best experience I’ve had as a first year architecture student and I’ve enjoyed working in the workshop.”

IMG_8084 This model is put together with a good selection of materials that help to demonstrate the different component of the design shown in section. Mahishini made good use of pre existing strip materials by choosing styrene H beams to construct what would be the steel frame of her building if made at 1:1. Strip materials such as these are extremely useful in section modelling and we hope to stock a range in the near future. In the mean time they are available from 4D Modelshop where you can also register for a student discount quoting either myself or Jim as your tutor here at Manchester.

IMG_8152 IMG_8244

IMG_8088 IMG_8248 IMG_8250

‘In Limbo’ Presentation Site Model, Laura Minca

Laura SiteIntimate Cities student Laura Minca has designed an ever changing settlement within the city centre. The site, on the corner of Whitworth Street and Princess Street in Manchester has been a site of a stalled project for some years now. Laura’s concept would allow the site to continue to expand and develop as required with a construction crane remaining on site to build as the site needs evolve.

INTERIOR3


Laura gives us a description of her project below:

The project aims to initially investigate the city of Manchester under a temporal lens, focusing on the spaces ‘in-between‘ worlds, ‘in-between’ stages of development that resulted following the economic downturn. At the heart of the city’s commercial and conservation area lies Origin – unfinished, incomplete, abandoned, hiding behind faded slogans of glamour and projected fantasies of luxury living and work opportunities.

The research and output developed as part of the [Intimate Cities] Atelier will be focused on the current condition of the Roma groups that have targeted the United Kingdom ever since Romania’s entrance in the European Union in 2007. Although their ‘nomadic’ condition is debatable and its deriving taxonomy should be reassessed, the Roma groups provide a fascinating case study in terms of a traveling community’s continuous struggle to adapt within fluctuating social, political and economic climates. 

The temporal context of the project is set starting with January 2014 when the transitional controls on free movement adopted by the UK will end. Following the lift of the travel restrictions and free access to the UK labor market, a high influx of Romani groups are expected to arrive and settle within British and implicitly, Mancunian territory.

Drawing on dichotomies of spatial purity and impurity, on notions of boundary, transience and spatial justice, the scheme proposes a temporary, modular structure that plugs into the existing site infrastructure – a contemporary Roma camp, aimed to provide the incoming community with a set of architectural and spatial principles that develops incrementally.

The focus on temporary, adaptable, shared spaces challenges the sedentary predisposition specific to Western architecture and its affinity towards grand, enduring structures. The approach is driven by the idea that architecture functions as an ideology in built form, that homes are more than just fixed dwellings, more than just sheltering devices: they are tools that enable the communities that use architecture to carve their identities and redefine visions of themselves and their collective subconscious.

This is not a scheme about pristine, perfectly aligned spaces and sleek technologies, but an exploration of imperfection, of the random and the improvised. A breathing, ever-changing structure that echoes the unconventional ways of the Romani people and their ability to adapt in any given environment. (Laura Minca 2014)

Concept renders of how the site would look.

E1 R3_Context2

The scaffold construction that makes up the bulk of the design was represented by engraving the framework on acrylic sheeting and rubbing in acrylic paint to the define the details. This effect is much more efficient that attempting to construct each scaffold piece or laser cutting the frame at this scale.
Laura Minca  (6) Laura Minca  (8) Laura Minca  (9)Laura used wood stain to define the site from the surrounding area. this was achieved by masking the edges and applying more coats of stain to darken her site footprint.

Laura Minca  (11) Laura Minca  (12) Laura Minca  (15) To create the tent like canopy above each area of the site Laura used a vac-formed sheet to create the draped fabric aesthetic desired. This was achieved by creating a former using Ureol Modelboard which was sanded to the correct shape then placed on a base to sit on the bed of the vac former.Laura Minca  (18) Laura Minca  (19) The vac forming process involved heating up styrene vac-forming plastic which is then suction formed around any given shape.Laura Minca  (20)

The completed form is then taken from the bed and trimmed to size for use on the model. Laura Minca  (21)

Laura Minca  (25)Further detail was added to the internal floor spaces using laser cut cardboard fixed to plywood floor plates. This plates were then assembled and slotted into place into the main framework before having the roof canopies fitted above.

Laura Minca (3) Laura used brass etched scaled figures to convey the use of the spaces with figures dotted around the site and near the context. Small pine cones were used to represent trees which always works well with wooden based models. These can be found on various trees and bushes around campus! Laura Minca (4)

Once all scale elements were added and surround massing models were made using Jelutong block, the model was moved into the studio for photographing.

Laura Minca (3) Laura Minca (19) Laura Minca (24) Laura Minca (45) Laura Minca (84)

Plaster Casting guide inspired by Timothy Richards Models

Earlier this year myself and Jim went on a visit to Timothy Richards workshop in Bath. Read more about that visit here.

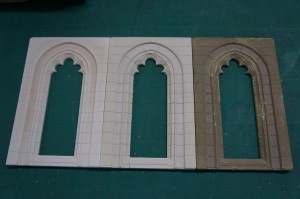
In response to what we saw there we decided to have a go at casting some facade tests of our own to demonstrate to you the potential when using this method for modelmaking. Starting with some reference images of the University of Manchester Archway we decided to focus on one of the Gothic style windows as our subject.

Making a ‘Master’

Initially recreating the form of this stone work in miniature may seem time consuming but as you will see the end results are fantastic and the intricate detail featured is easily replicated by casting.

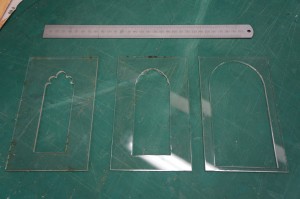
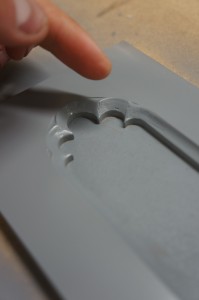
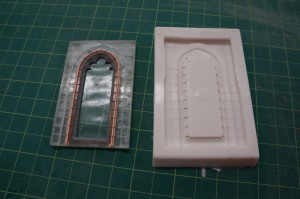
A good way of creating details like this is by layering sheet material, in this case acrylic. Planning the layers on CAD will allow you to break down the details into manageable  stages (Above). When combined, the layers of laser cut acrylic form the recesses and steps in the winder with the radius in the stone work being replicated using a filler and hand sanding (Below).

Spraying a coat of primer paint on hand finished areas can help to identify any imperfections in the surface (Below). This primer can then be sanded back

The extra details of the window can be formed using styrene and or abs strip with any further radius being creating again with filler. Once complete the master model is ready to be moulded. 
 Pouring a Silicone Mould 

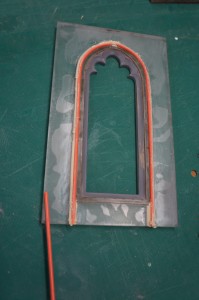
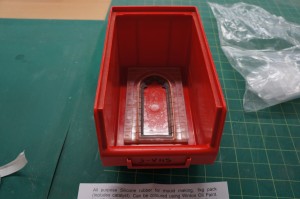
The are a wide range of silicone’s available for mould making so it is always advisable to check the specification of individual products before committing to use them on your master model. Firstly ensure the master is secured to a mould former – in this case we used a storage try which suited but bespoke formers are usually required.

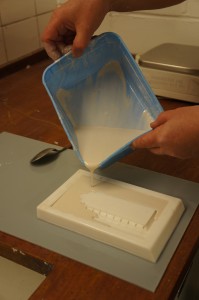
Ensure the silicone is mixed to the manufacturers instructions and pour in a thin stream to avoid any air bubbles forming against the master mould. Ensure the master is sufficiently covered and allow to cure for the recommended time.

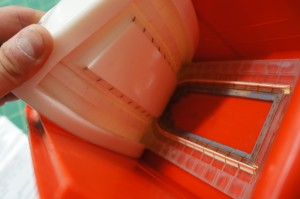
Once cured carefully remove the silicone mould preserving the master mould to be reused if any problems occur. The benefit of using silicone is that the flex allows the master and eventually cast items to be easily removed without much stain on the items themselves.  Some minor trimming of silicone overlap may be required before the mould is ready to be used for plaster casting.Plaster Casting
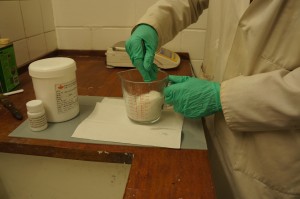
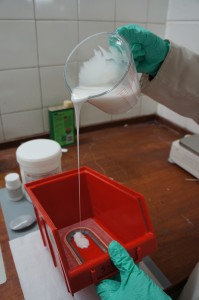
As with the silicone there are many types of plaster available so always check to see if the specification suits your needs. In this case we simply used stone plaster mixed to the correct consistency and poured directly into the silicone mould – no release agent required.

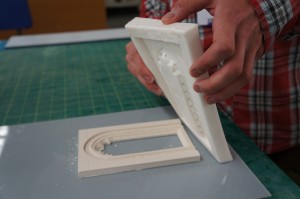
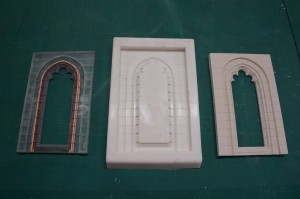
Once the plaster has set it can be carefully removed from the mould giving a completed cast. These sections can be used as tests or replicated to create a more detailed facade. 

One area we have touched on is adding pigments to the plaster mix to give varied results in terms of finished cast colouring. We will revisit this area when we have time to experiment some more and let you know how it goes. If you have any ideas that could make use of this method of making be sure to get in touch either via email or in person at the workshop. We are more than happy to help! Scott & Jim