This case study by Anca Trimbaciu shows us her proposed building within its enclosed site context of two existing buildings. So as not to take the focus away from her design the massing of the context buildings was kept simple. Anca wrote down her thoughts on the project for us:
“As part of first year’s final project we had to go the extra mile in explaining our design and idea. Therefore, we had to create a presentation quality model. My entire year revolved around butterflies, that being the animal I chose, so my building was also connected to them, being an indoor butterfly garden, a space for recreation and relaxation.
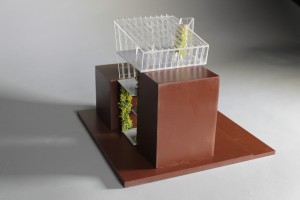
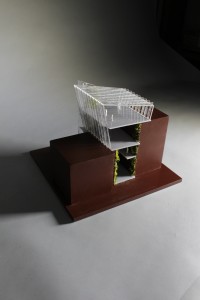
My design is a parasite building in between other two existing ones, which covers a very small space and puts focus around the staircase and the idea of ascension. As you move up you gradually discover spaces that are more open and luminous until the last floor which allows a panoramic view of Oxford Road from the inside of a “green utopia”.
 The model shows context, size and the purpose of my building. A section in the back of the model allows the viewer to see inside and observe how the building makes use of the adjacent existing buildings and how double volume appears during the ascension towards the top floor.
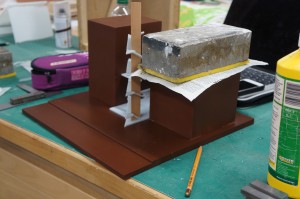
I used painted MDF for the adjacent buildings and the base of my model just to give an idea of their size and appearance, contrasting with my design through colour and texture. Other than that, the rest of my model is mostly made out of clear or grey acrylic as it was the best choice to either represent glass, metal or polished concrete. The triangular staircase is sustained by a wooden column which is covered in vegetation. Because the scale is only 1:100, I opted for showing ramps instead of creating each step out of acrylic.

During the making of this model I had my first attempt at using Autocad and laser cutting, and surprisingly, I succeeded. I learned how to spray paint in order to completely cover the texture of a material and I improved my skills in working with acrylic. I also got the chance to fully understand my building and its structure.
It has been two well spent weeks in the workshop and I am looking forward to my next project, even though starting a model might be scary at first, the results are most of the times really impressive and worth the time.”
The construction method for this model was well considered and, much like the building process of a 1:1 project, the order of assembly was orientated around the ‘core’ access, in this case stairs, providing support for the different levels.
Of particular merit here is the consideration to how the massing was created. Rather than being solid blocks, the context massing was made up by creating hollow boxes which were then coated with sanding sealer, sanded and painted. This method saves on material and overall weight of the model and can often be done for free with off-cut material.


 The material primarily used in my design is concrete. To mimic this in my model, I used laser cut MDF covered with spray painted sandpaper. Rather than making a mould and casting it, this was a quicker and more economical representation of the textural and structural qualities that were required. The half-arch was made using plywood blocks which were stuck together, cut and shaped using the band saw and bobbin sander. The grain in the plywood helped replicate brick and mortar. For the seating, I needed a material which is thin, yet strong enough to sit on the wooden support frames and decided on using mount board. Finally, I used laser cut frosted acrylic pieces to represent the translucent cladding found in my design.


