
Tag Archives: casting
Guest Lecture: Dr Dawn Pereira – Concrete Too is Beautiful….

To give it it’s full title, ‘Concrete Too is Beautiful; How William Mitchell’s Casting Process Humanised Post-war Urban Landscapes’ will be presented by Dr Dawn Pereira next Monday, April 12th at 17.00.
The lecture will look at the fascinating abstract work of designer/sculptor William Mitchell (1925 – 2020) who is known, although certainly not well enough, for his use of concrete casting around infrastructure, in architecture and as public artworks in the UK and beyond.
Dr Dawn Pereira is an expert on Mitchells works and will tell the story of his origins, evolution and crafting process. The lecture will be followed by an open Q & A.
This lecture is part of the ‘B.15 Moulding and Casting 101’ course but is free and open to all.
Please join us here on Zoom at 17.00 on Monday April 12th.
Note that the lecture will be recorded.
Image of Leigh Turnpike Centre provided by Richard Brook.
Jesmonite Casting

Jesmonite is a gypsum based composite that when mixed with an acrylic polymer, cures as a solid form with a plaster-like appearance. The original product was developed in the UK in 1984 as a safer alternative to fibreglass. It has numerous applications in full scale architecture and across the creative industry.
Why use Jesmonite?
- Stronger than plaster and more impact resistant
- Replicates fine details from the mould with less chance of breaking
- Easily mixed with different colours
- Quick drying. Casts can be de-moulded within short space of time. Full cure/strength takes 24 hours.
- Solvent Free meaning less harmful to the environment and safe for use inside the workshop or studio environment.

As students of architecture Jesmonite offers you the same advantages as full scale building application giving it uses at a wide range of modelling scales and types.
After using it at Atelier La Juntana Summer School we thought we’d have a few experiments ourselves. Mixing at the standard ratio of 2.5:1 we have carried out several tests demonstrating how pigments can be added to create varied effects depending on your requirement. Whilst we currently hold a limited stock of the standard AC100 Jesmonite, it is readily available from 4D with your student discount.


Marble, Stone and Granite, Terracotta red brick and Concrete effects are easily achieved by mixing in paints, lacquers or different aggregate types such as sand. Metal effects can also be achieved using metal powders.
A really great and safe to use casting product – get casting!


Low-Melt Metal Detail Casting by Jana Kefurtova
Jana explained her project for us:
The 1:10 detail fabrication was my first-ever casting exercise and definitely one of the most exciting tasks I have been involved in throughout my architecture course. It required a lot of preparation and careful planning of each step, but I was extremely happy with the outcome and I would repeat it if I had a chance. The key to success was to understand the casting process and plan the whole procedure beforehand.
Firstly, I modelled the hinge in SketchUp and tweaked it several times to make sure it was water-tight for 3D printing. After it was printed, I added an additional layer of acrylic to increase its thickness in certain areas, which was necessary for creating the mould. This step could have been avoided, had I known better how the mould was to be created. As I learned, it is definitely worth carefully checking your 3D model with the staff before printing. You do not want to 3D print repeatedly due to the relatively high cost of the process and unavailability of the printers during busy deadline times.
Next step was a fabrication of the mould, which was to be as tight as possible in order to save the material (silicone). When pouring the silicone, I did not mix it well enough with the activating agent, which caused it not to dry properly overnight. Luckily, it was still possible to save the mould by additionally mixing more activating agent into, and the whole mould came out really well in the end.
The putrid pouring was probably the simplest step of the whole process, however, there were still lessons to be learned. The mould has to be fixed together very tightly with clamps, as the hot metal is unexpectedly expansive and it will push your two halves of the mould apart. I repeated the casting itself twice, as the first piece was not perfect. This did not require any additional material as the first cast was simply melted.
The metal hinge was then integrated into a sectional model of a timber door to show its function. This was another part of the model-making task, which took almost as much time as the casting itself. One of the unique aspects of this exercise was that apart from the putrid and silicone, I only used scrap material from the workshop: acrylic, timber, plywood and MDF. This significantly reduced the price and proved that almost every piece of material that a student disposes in the workshop can be used further by someone else.
Working with metal left me being amazed by its strength and heaviness combined with plasticity and the ability to be shaped into very fine details. It might seem like a challenging material to handle, but it is in fact incredibly fun and fascinating one. I would recommend casting to anyone who wishes to add something bold and unique to their project.
– Jana Kefurtova 2016
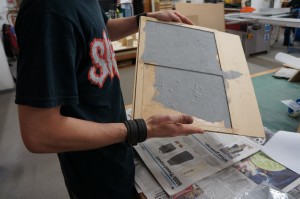
Designing the Mould
When it comes to successful casting the work is all in the design of the mould. There are many considerations to have that require some reverse engineering in your mind before being able to pour the first cast correctly. In this case as Jana was creating her cast detail from scratch she had to first make the detail the the correct scale in order to have the mould be created around it. This was done using a combination of an ABS 3D print and some laser cut elements.
Due to the final cast being in metal a suitable silicone for high temperature casting is essential.
Here are some key considerations when designing a mould:
- The mould should always be designed to use a minimum of casting material (in this case the expensive heat-resistant silicone) to ensure you are getting the most from it without having to overspend.
- How are you going to pour material into the mould?
- The mould must also consider the cast removal – Will the cast piece come out in one? Does the mould have to consist of multiple parts? If so how can we effectively locate these parts to ensure an accurate cast?
 In Jana’s case it was decided that the mould could be created in two parts. In order to do this the master model had to be suspended in the middle of the mould casing to allow the first half to be poured. The support piece that was used to suspend the piece would also serve as the pour hole once the mould was ready to be used. In addition to the overall shape of the mould casing Jana also added two location ‘lugs’ which would allow the mould to fit together exactly. These lugs were in place until the first half of the mould had cured before being removed to allow the second half to create the positive part of the lug.
Before pouring the second half of the mould it is important to add a release barrier to prevent the two halves sticking together. In this case a spray wax coating was used but there are several products available for the job. 
 After the second half is cured the mould can be taken from the casing and any overlaps in the pour can be hand trimmed and removed ready for casting.
 Low Melt Metal Casting
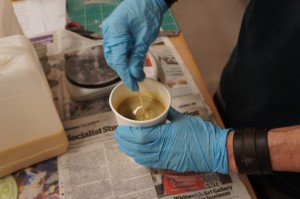
Once the mould has been trimmed and cleaned of any foreign matter you are ready to cast. To ensure the cast is easily removed from the mould it is necessary to lightly dust the mould halves with talc.
 Suitable casting metal can then be broken up and melted using a melting pot. All equipment and elements used are specifically for casting purposes and you should always be sure the products are suitable for the job you are attempting.
ALWAYS WEAR HEAT RESISTANT GLOVES WHEN WORKING WITH HOT METAL AND EQUIPMENT!
Once the metal is completely molten in the melting pot it is then time to fill the mould using a suitable ladle. In this case it was necessary to have an extra pair of hands to support the mould whilst pouring.
Pouring in one smooth action will help to get the best quality cast. In this case it was necessary to pour three times to fill the mould. This is not idea but due to the working time with the molten metal the cast was crisp and consistent after a second attempt. (A key benefit of this material is that any failed attempts to cast can simply be broken up and re-melted to be recast meaning little waste material)  Allowing around 15 minutes to cool is important so as not to distort the metal when trying to remove it from the mould in a soft state.
  The competed cast piece was then hand finished before being added to Jana’s functioning detail model. The moulds made for this project and the resulting detail model are currently on display as part of B.15:ARCHITYPES on the first floor of our building.

 All equipment and material used here is available from 4D with your student discounts.


Mouldmaking using Gel-Flex PVC Compound
Anyone who has experimented with casting will appreciate that the process of designing and making the mould is the most critical part of the process. ‘One-off’ simple block or slab casts can often be produced using scrap mdf to create the framework before pouring and then breaking the frame for removal of the completed cast. This is usually successful but can be restrictive in terms of detailing and can often mean destroying the mould to remove the cast.
In order to capture more intricate details of an object we can use silicone rubber which is widely used in the art and design industry. The main drawback of using silicone is its cost and only having one-purpose once it has cured.
A great alternative we are encouraging for testing is ‘Gel-Flex’ PVC Compound which can be melted, poured, cast into and then remelted and re-purposed to make several moulds with the same amount of material.

 Using Gel-Flex
At present we are unable to provide a method of melting the compound in the workshop but this product can be easily used at home by heating using a conventional hob or microwaved in a suitable dish (As Monty explains below – preferably glass!). Instructions are provided with the product which you should always read and make sure you understand thoroughly before using.

Once the product is in a liquid state it is poured in the same way as with conventional silicone mouldmaking into a box mould over the object you are wanting to cast.
The main drawback to using Gel-Flex is that it isn’t as durable when being used to produce high numbers of casts. Eventually the mould can become over-stretched and can rip. The beauty being that the material can then be melted again and poured to create the mould again – eco considerate and cost effective if you need to mould multiple items.

Case Study: 1:1 Facade study casts by Monty Dobney
“Gel Flex was great to create the intricate detailing required to for a 1:1 model of my paternated bricks. I first laser cut and glued together (the most time consuming step) an mdf master for the mould to then be covered with the Gel Flex.
After reading the instructions I decided to melt it in a microwave oven, on the first attempt I melted the plastic ‘microwaveable’ container which I had decided to use to melt it in. But two containers stacked seemed to do the trick for holding their form! It was also important to keep checking on it as it can very easily ‘over cook’ which turns it brown (as can be seen in the image below) and a strong burning plastic smell! I successfully used the Gel Flex to cast from both plaster and wax.”


Gel Flex is available to buy from 4D Modelshop where you can get 10% student discount or at Fred Aldous in Manchester and can be found by clicking here.
In the style of Piranesi – Experimenting with Metal Powders in Resin
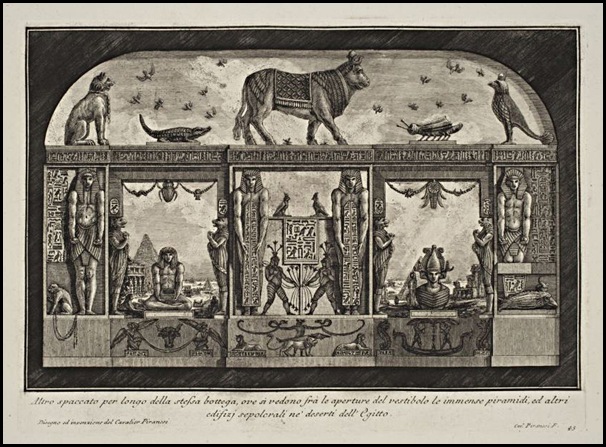
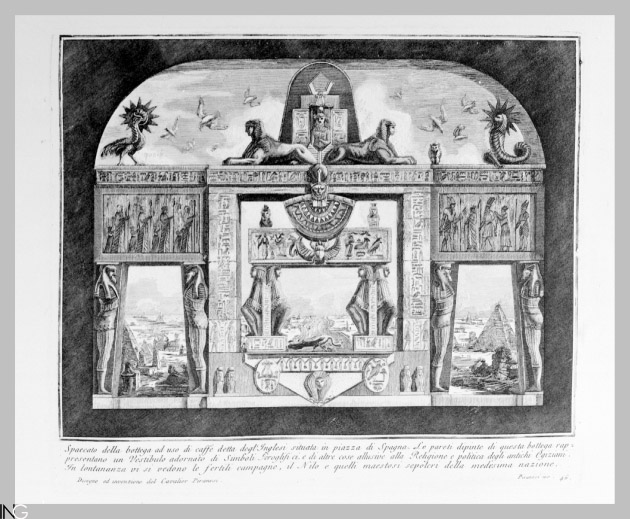
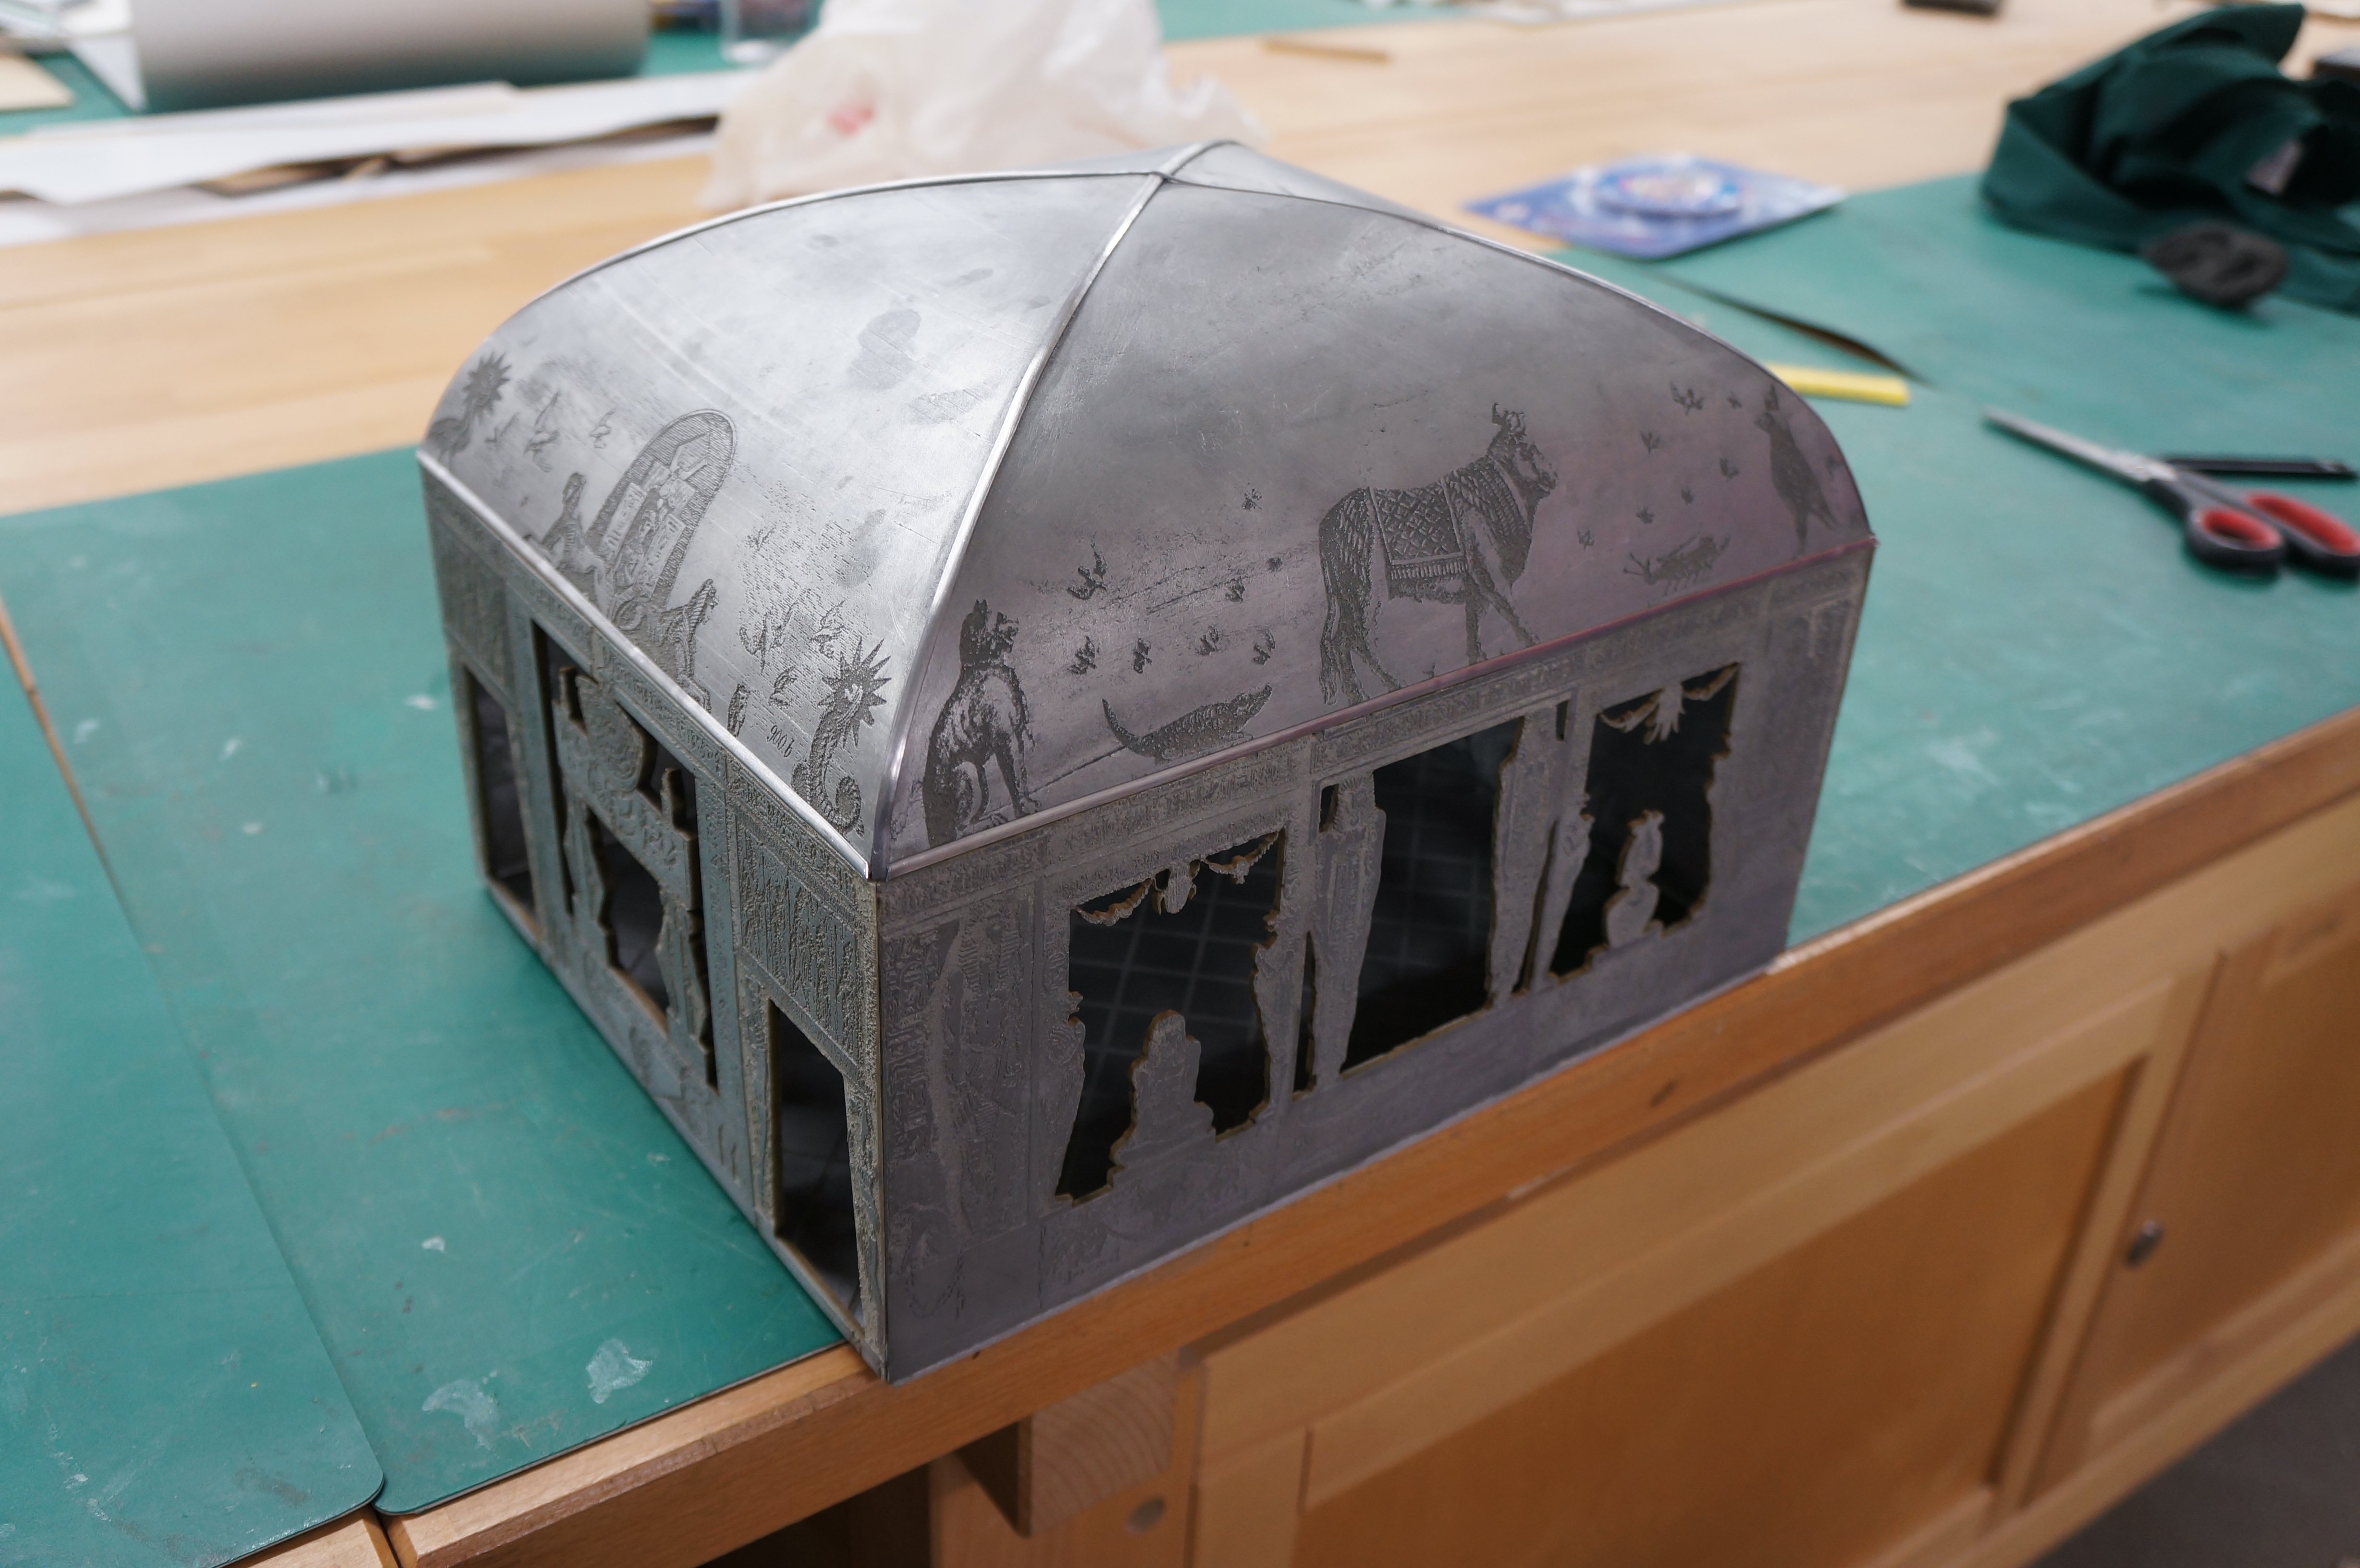
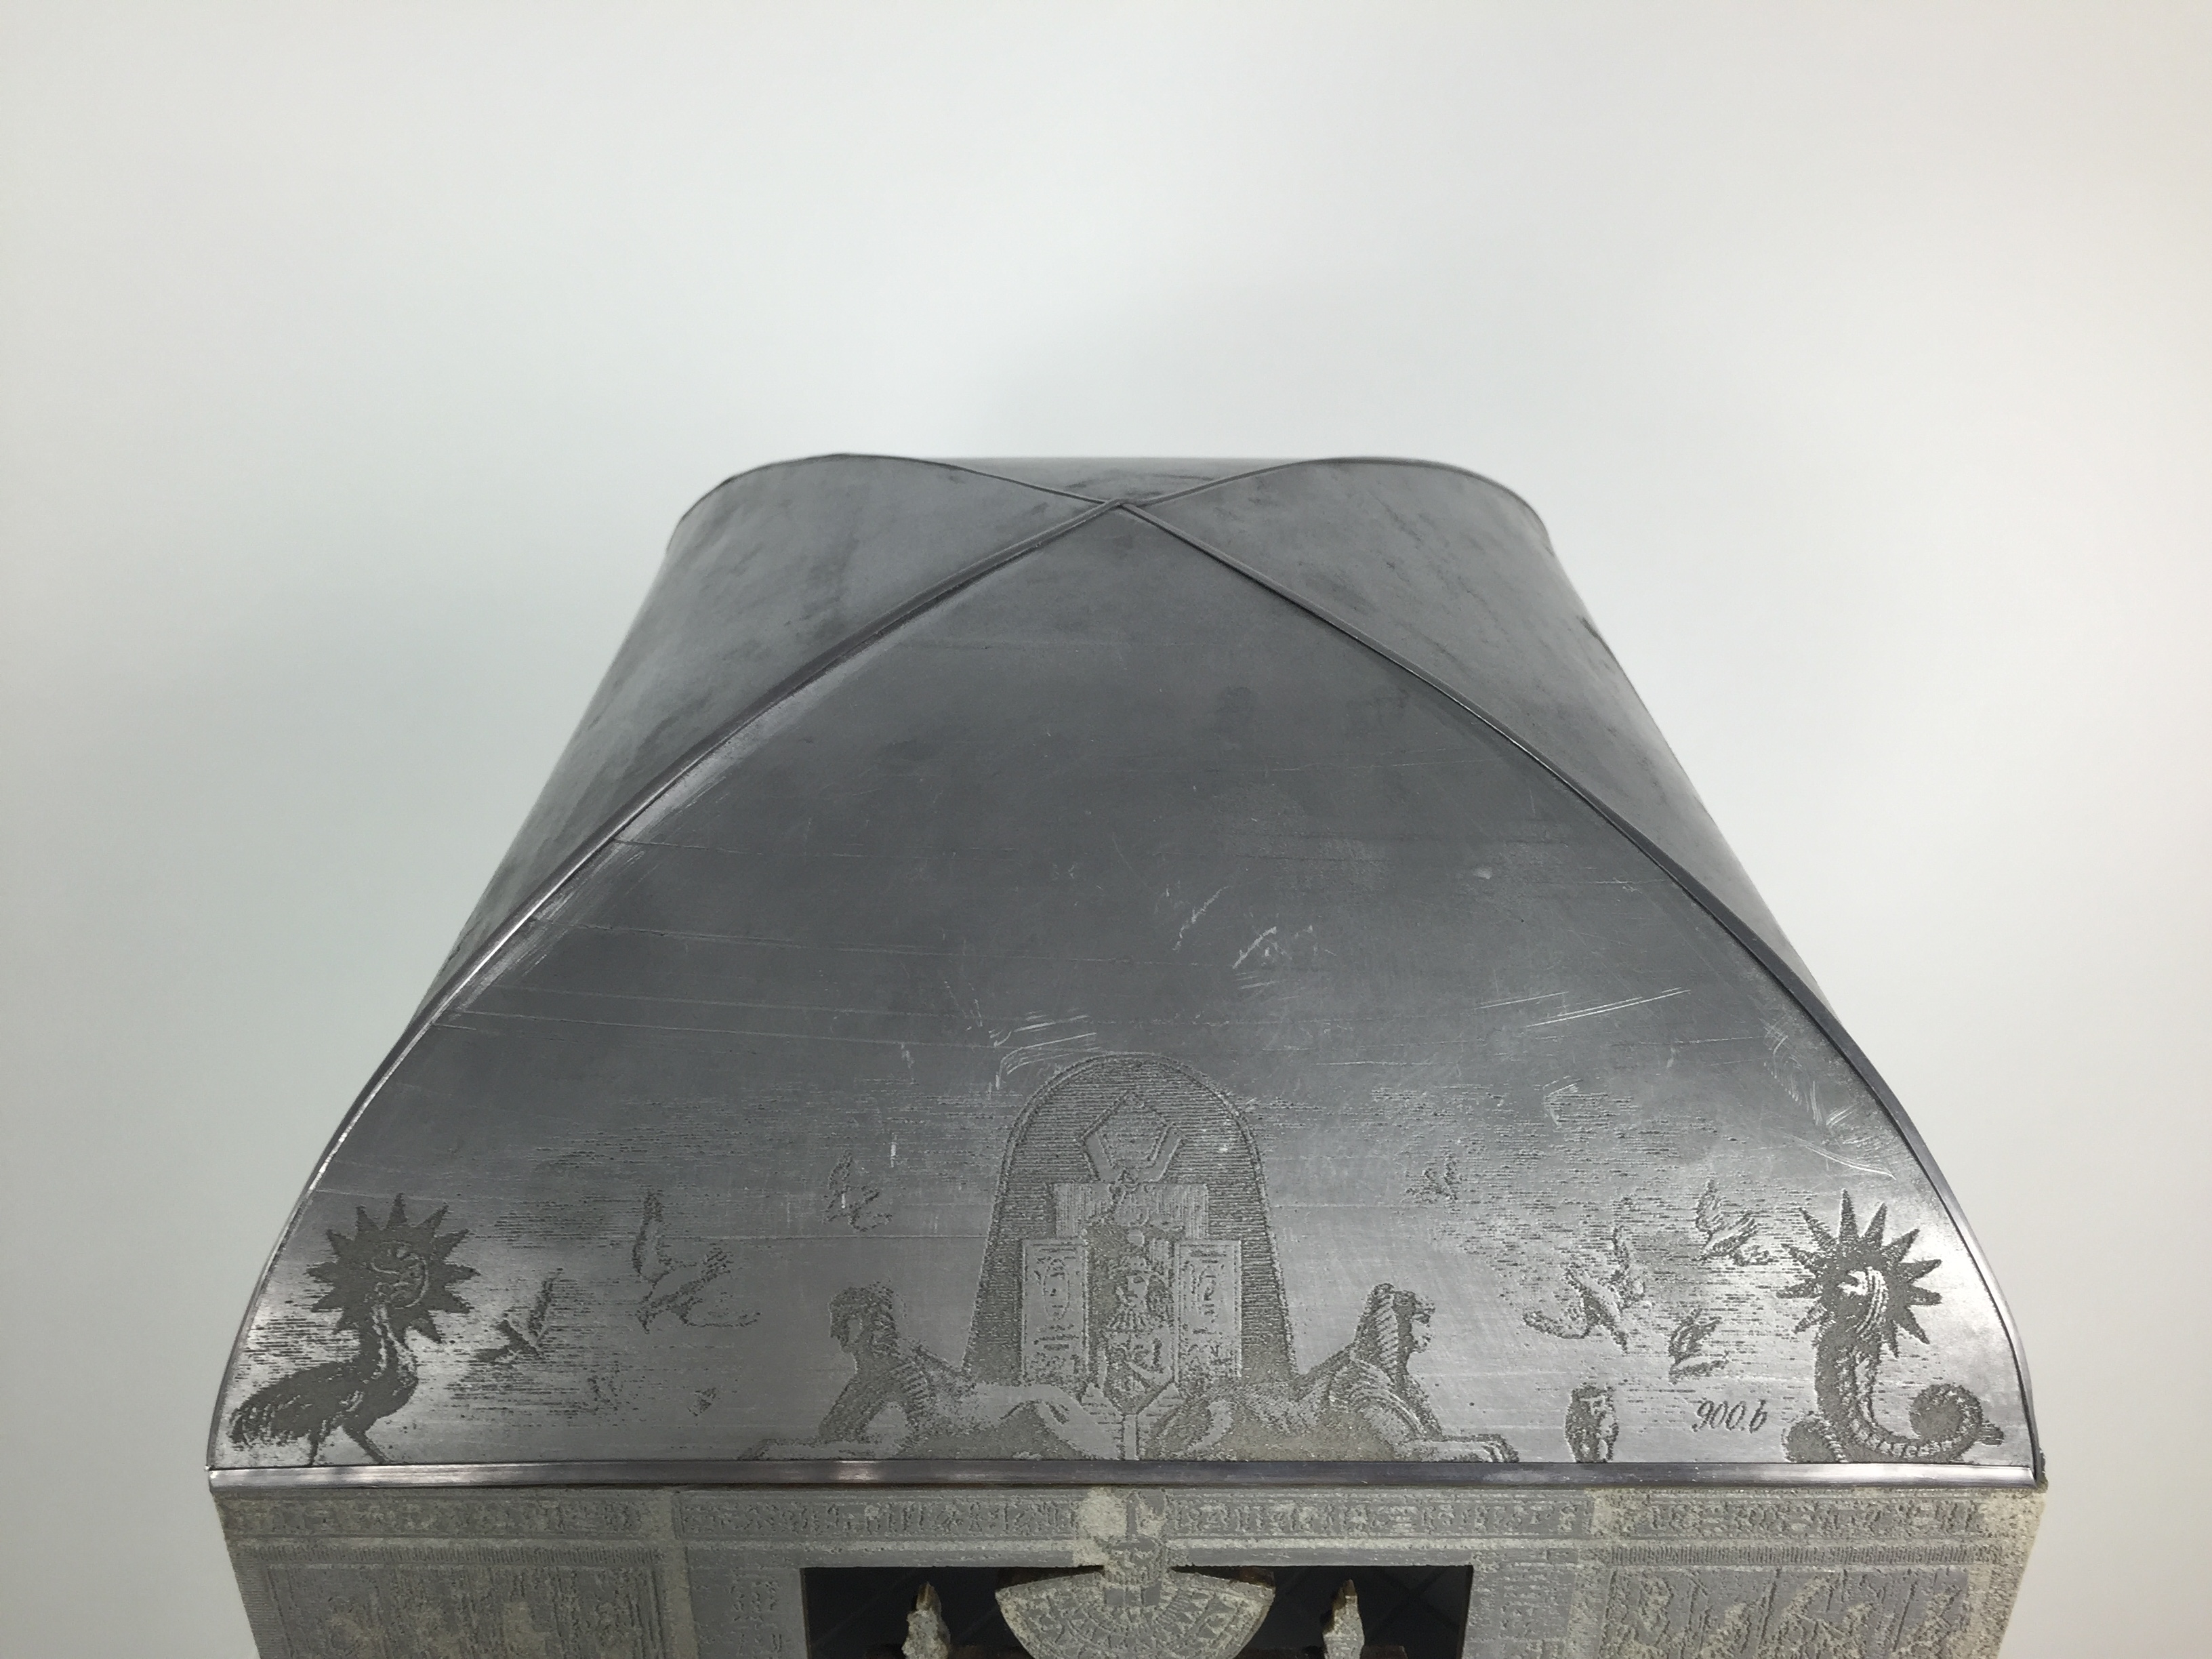
“Designed in the 18th century by the artist Giovanni Battista Piranesi (1720-1778), Caffè degli Inglesi in Rome, just moments away from the Spanish Steps, is a prime example of a lost ‘cultural cafè’. Renowned for its eccentric Egyptian style, it was a main hub for British artists visiting the Eternal City. Although it was a key centre for culture and artistry, the café’s design divided opinion. Caffè Degli Inglesi only survived for circa 20 years.
Only two plates etched by Piranesi himself have survived that depict one long and one short internal wall. Because of this, our main challenge was re-imagining the space. As the cafè is long gone and we have no information in regards to the materials, colours, techniques employed, it therefore seems clear that the physical architecture of this space shouldn’t be our main focus, but capturing the lost atmosphere by trying to create a ‘shadow’ of the lost physical space.
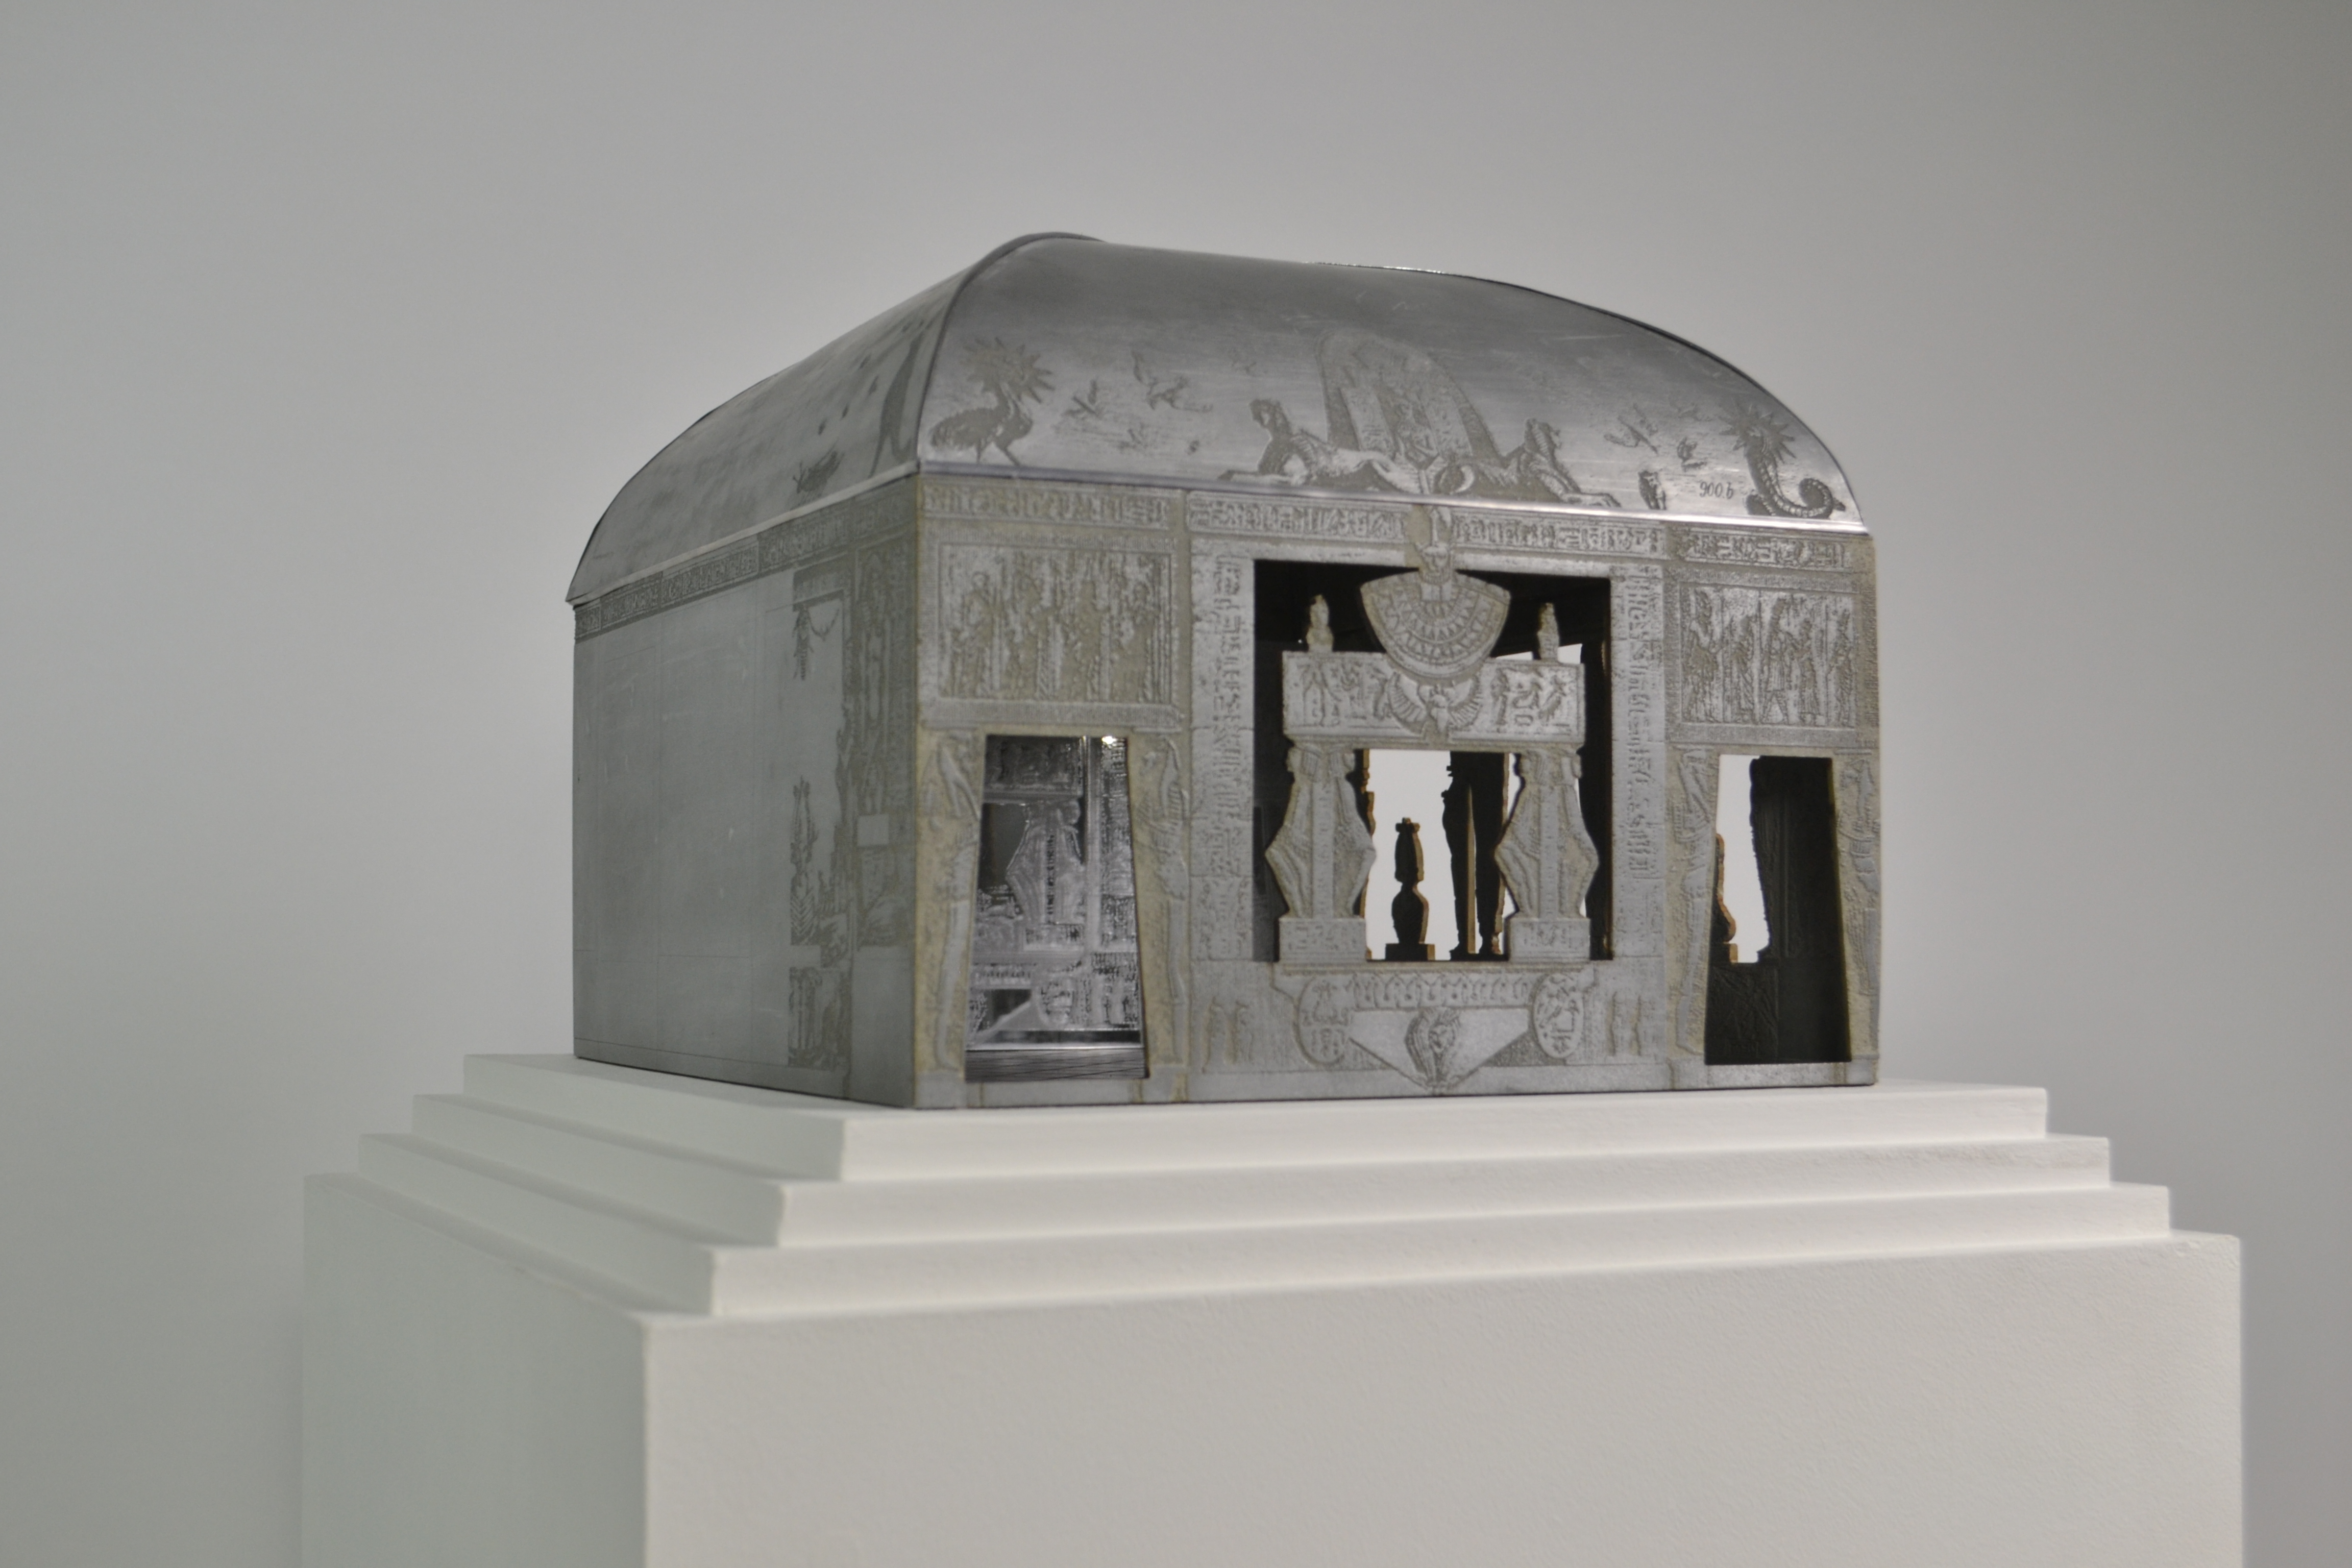
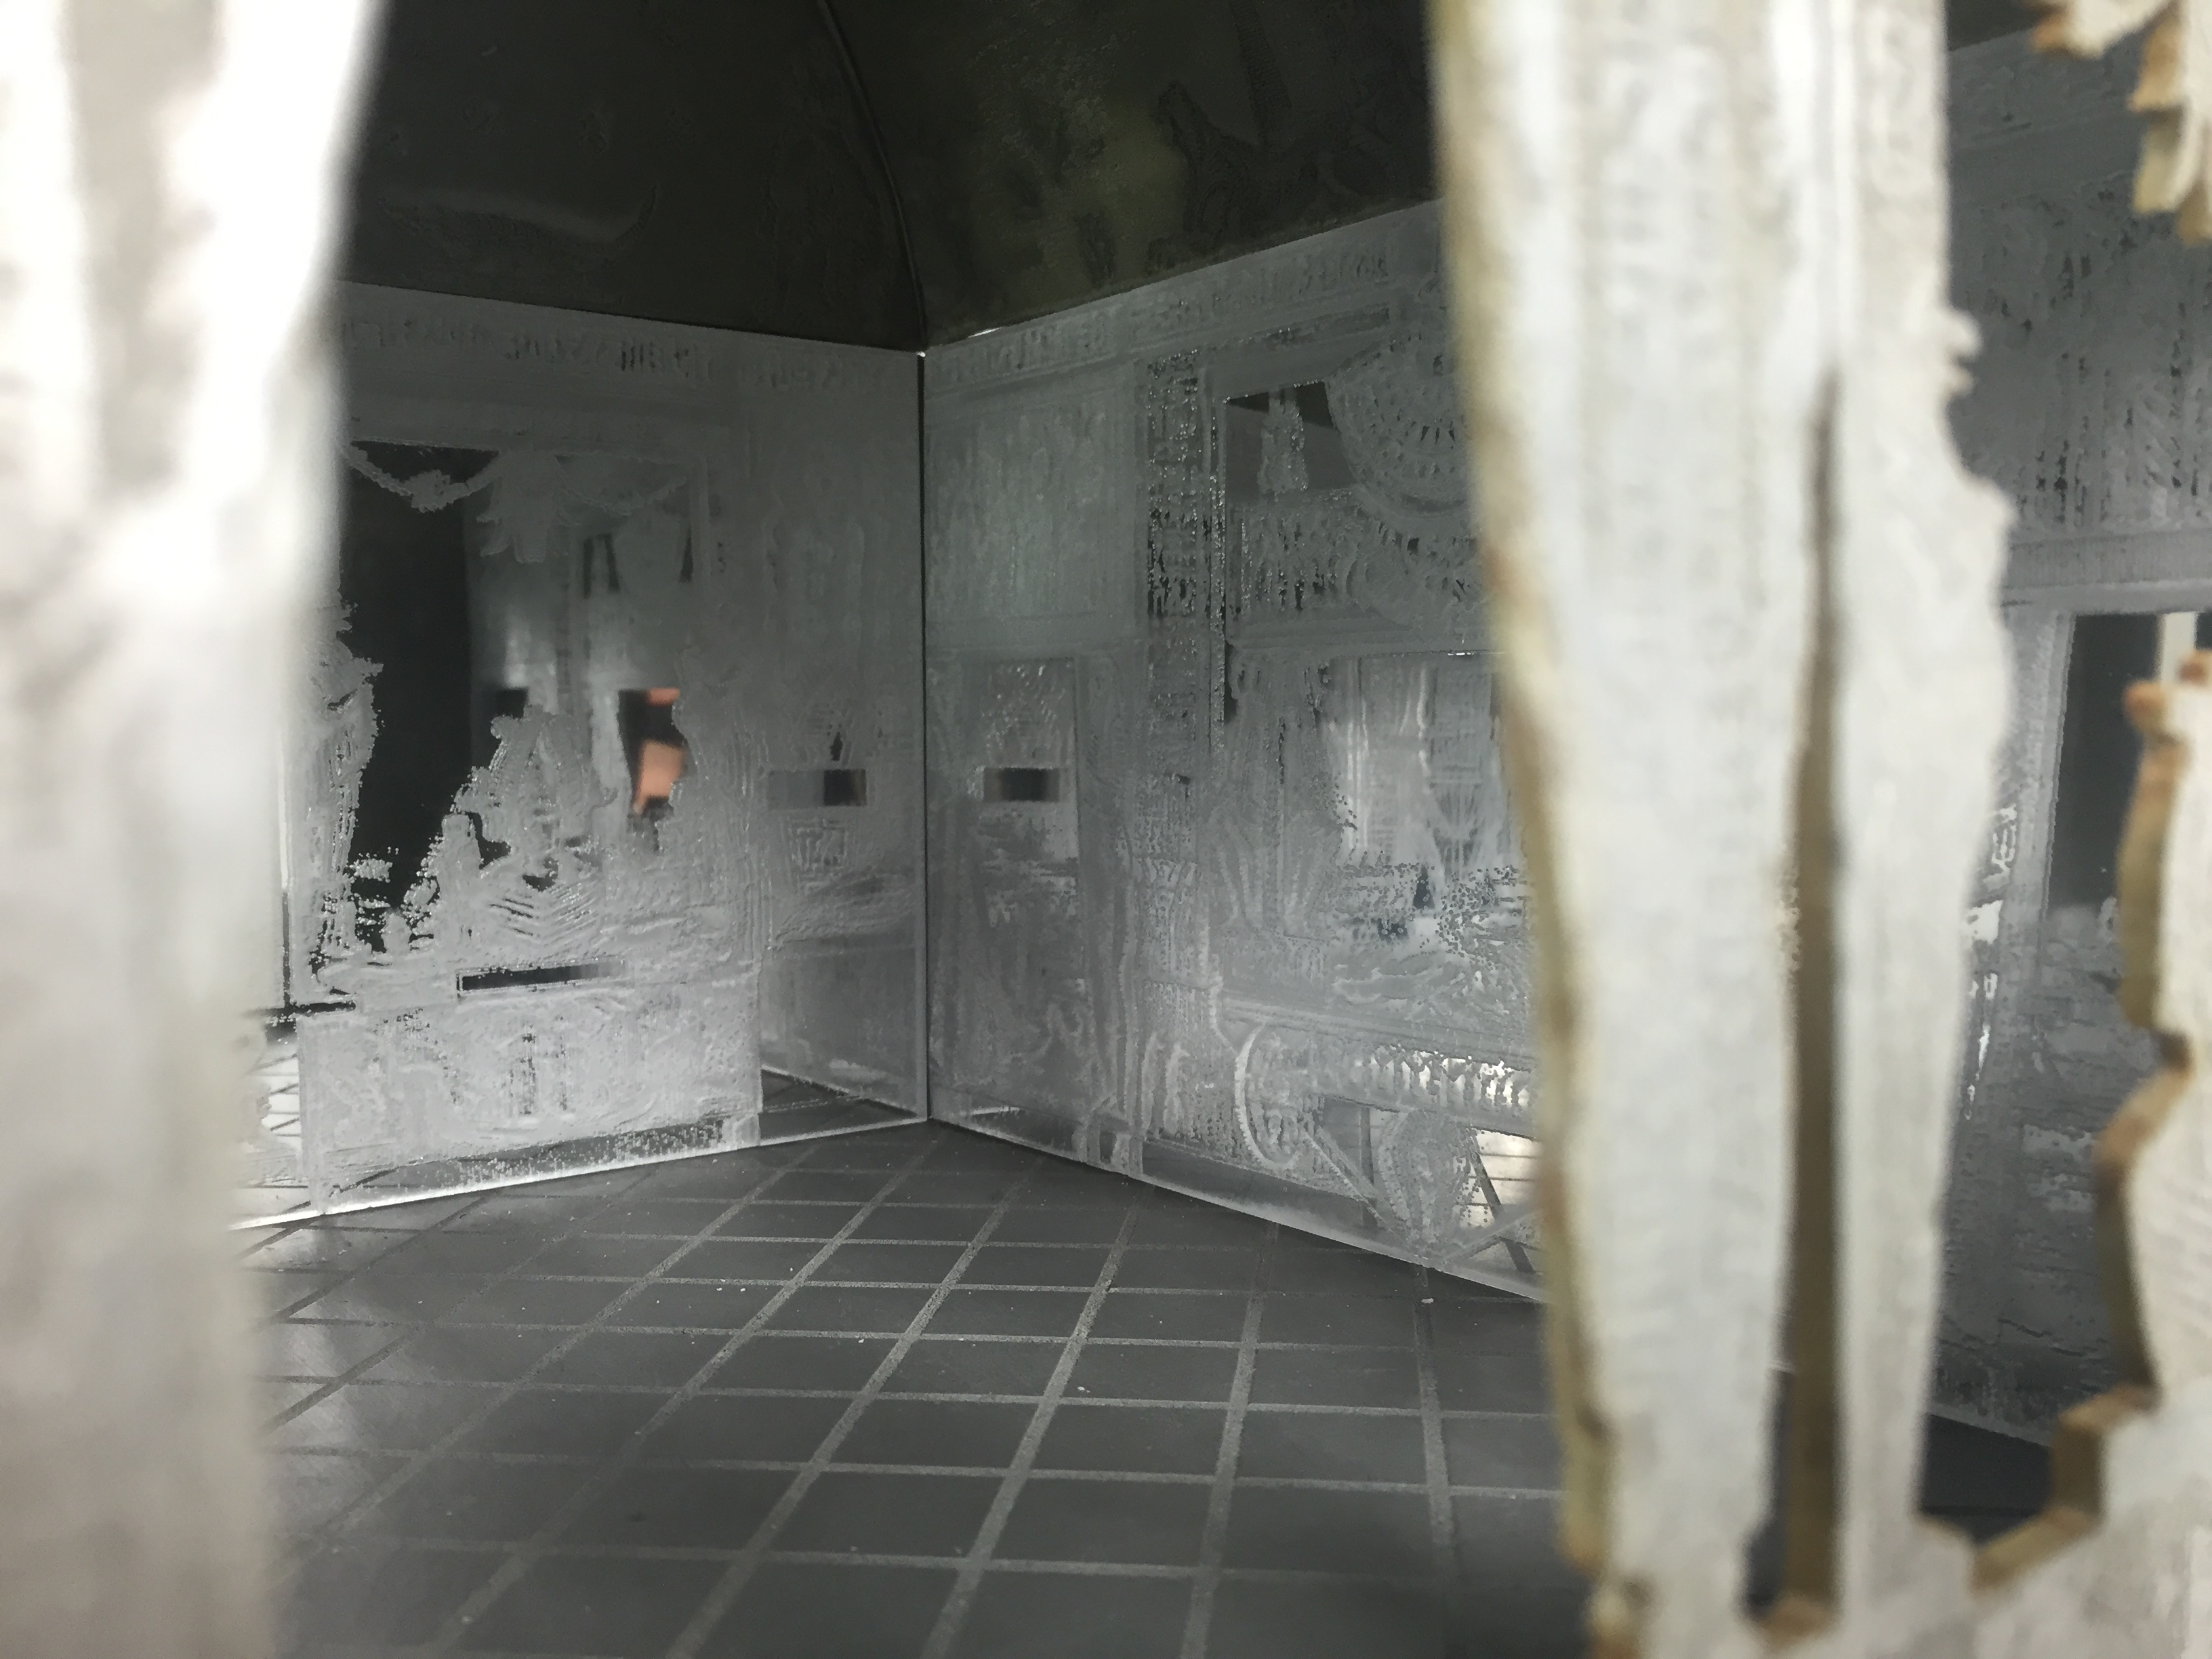
When creating a three-dimensional model, it was obvious we needed to depict the two undocumented walls in a way that does not mimic nor assume, but can capture the spirit needed for the café’s re-interpretation. We are therefore suggesting the use of mirrored walls, providing an immersive experience, without compromising the integrity of Piranesi’s unknown original design.
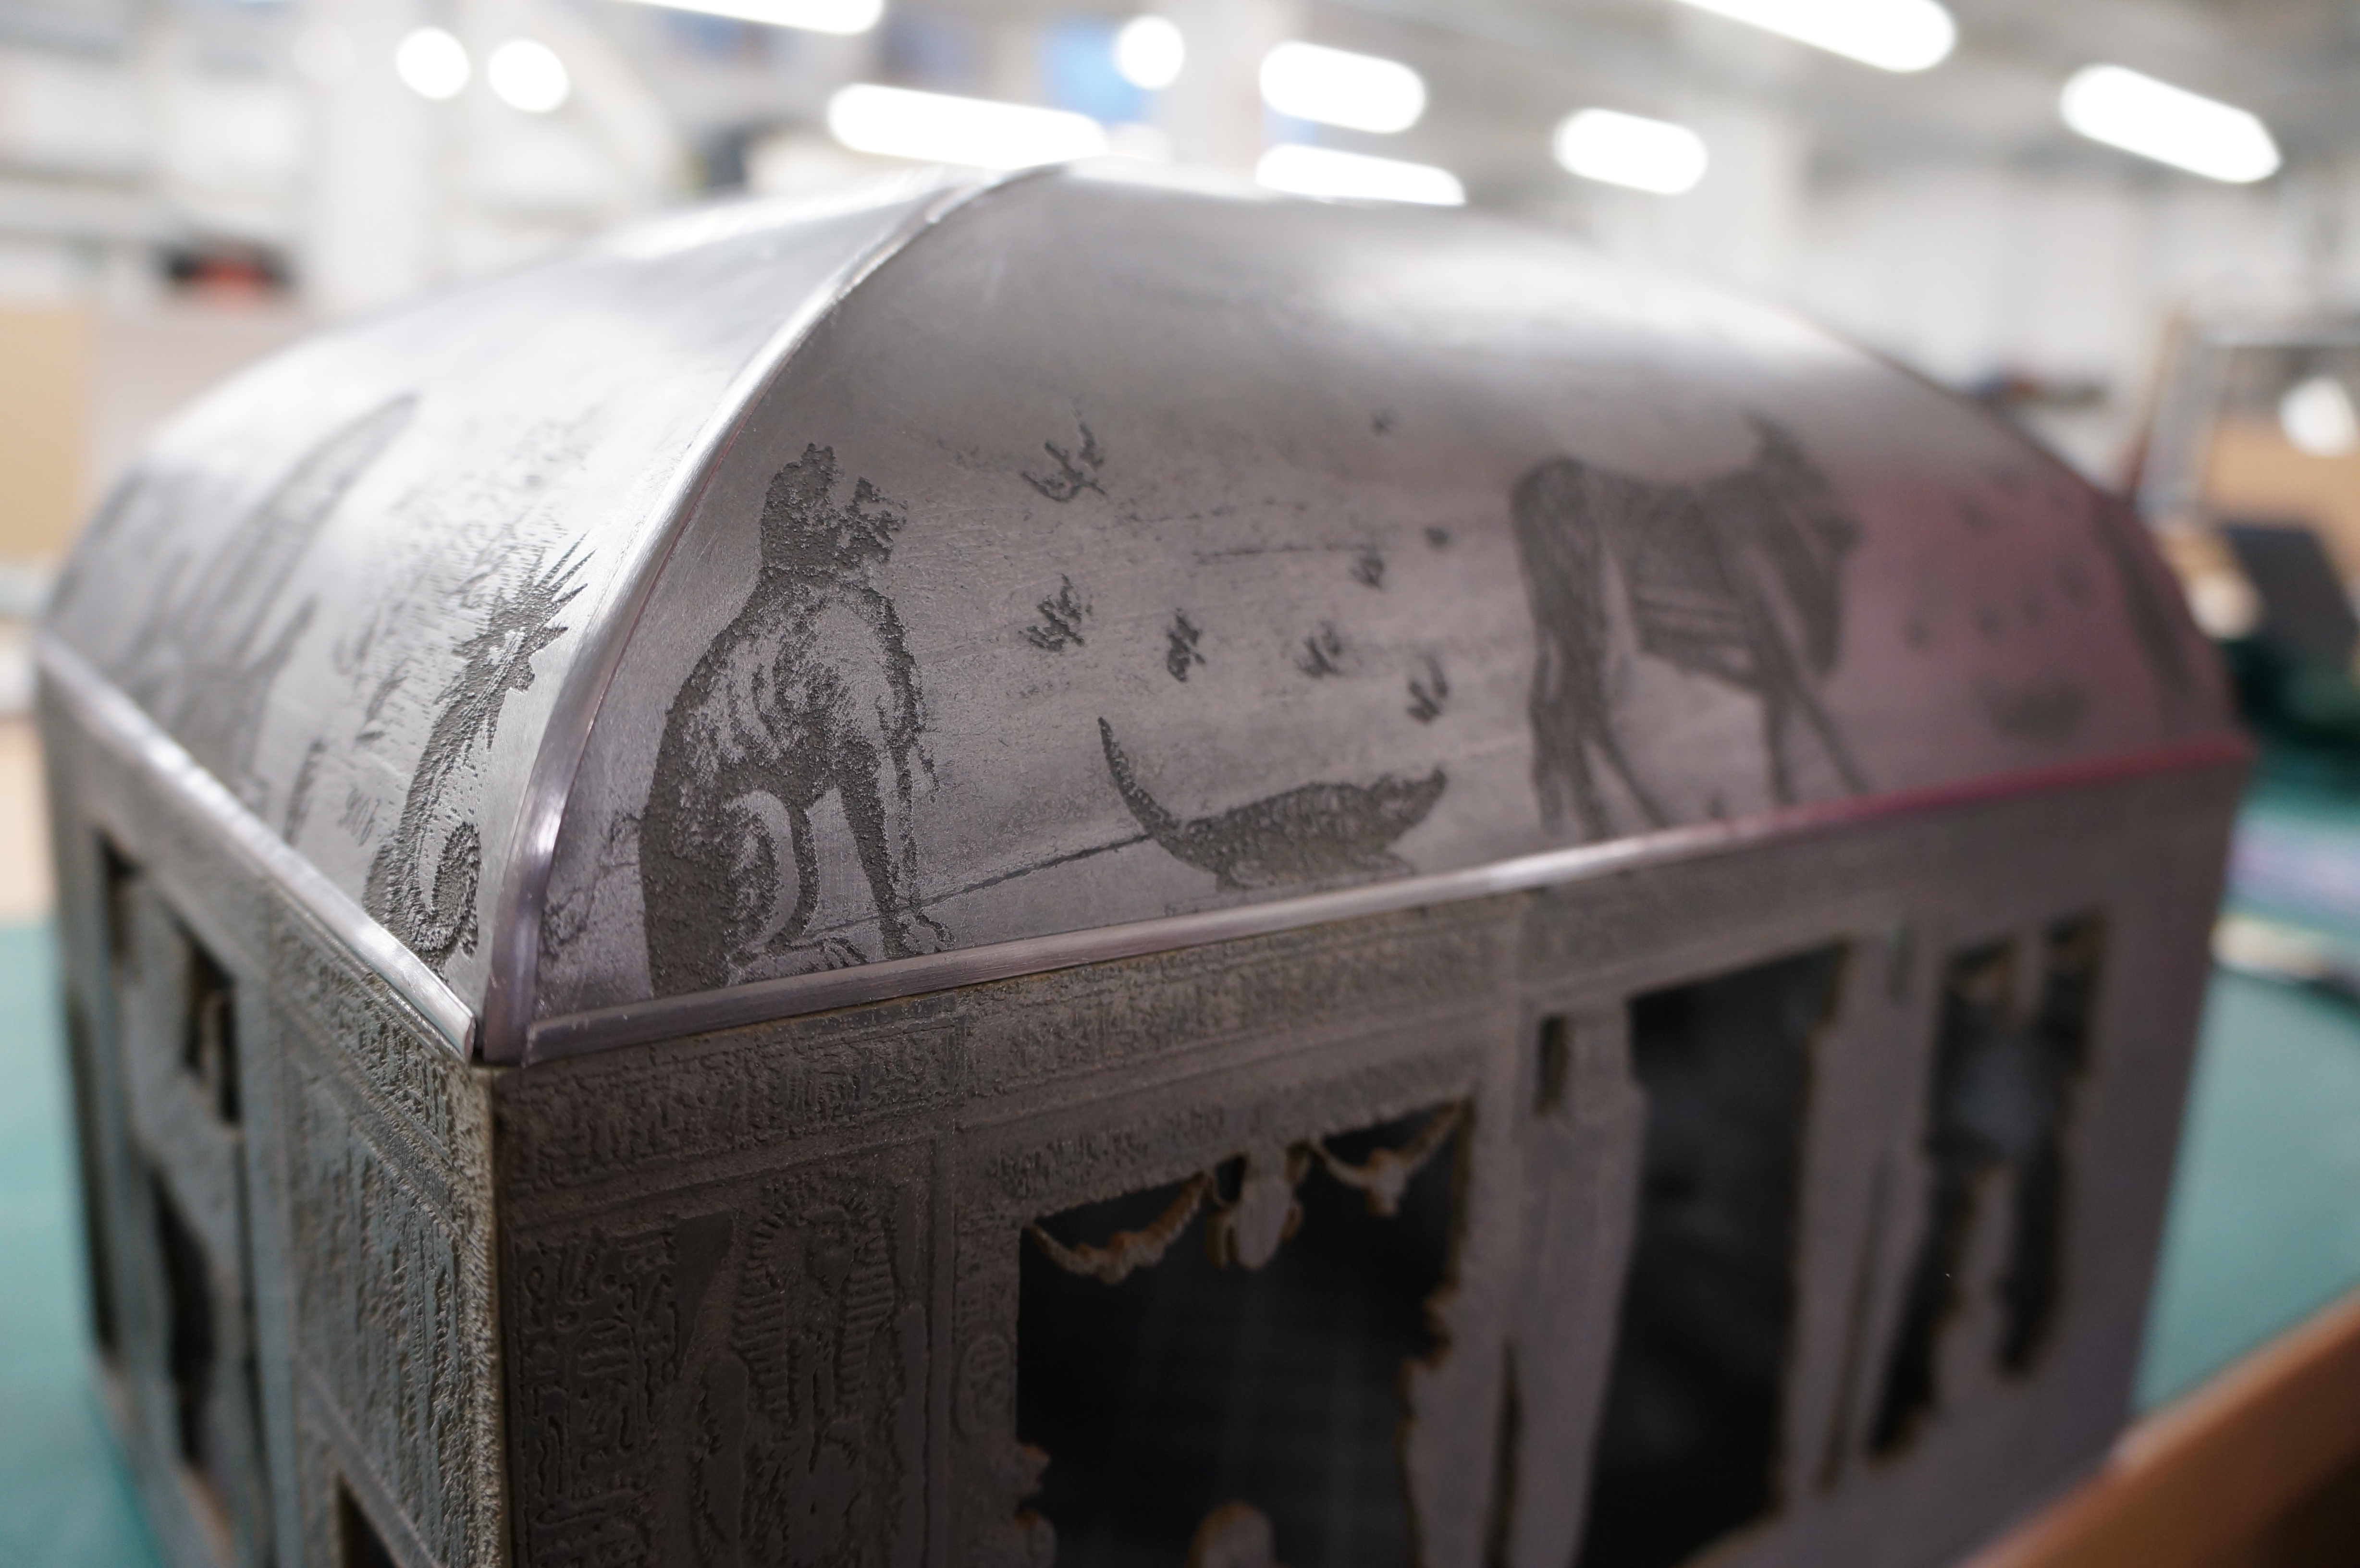
The material choice for the rest of the model was intended to hint towards Piranesi himself’s original metallic plates. The time and expense required in producing real metal plates was soon deemed too unrealistic, therefore an innovative solution was found in aluminium powder mixed with resin to create a metallic, durable cast acrylic sheet. From these they were able to be handled by machines such as the laser cutter in creating the etchings on both sides.
A challenge came in the creation of the vaulted roof, where the material was heated following the etching process and formed around a pre-made mould. The 4 sheets were then filed so that the edges could align as best as possible. Assembly of the model involved super-glue, epoxy resin (made metallic in the same way as the cast sheets to match) and finishing using 3mm self-adhesive lead strips.
We were asked to display the model on a 400x400mm plinth. This was created with a number of feature to help enhance the model, for instance the plinth was created to be 1500mm high in order for the model to be viewed from eye level and allowed the viewer to experience the mirroring of the materials within. The rectangular shape of the model was then rationalised by creating a series of steps at the top of the square plinth, the final step incorporating a step down to fit the model so that the floor plate runs smoothly from outside to inside. The plinth was then painted in a matt white, with a shadow gap creating a neat finish between plinth and floor.” – Vanessa Torri & Daniel Kirkby 2015
Making the Model
For this project it was decided to make the wall thickness 3mm for ease of construction as well as keeping the material use to a minimum. Simple tray moulds were made up using strips of 3mm MDF that were double sided taped down to a base. This aids an easier removal from the mould once the cast has cured.
Note – if it is clear that a lot of the same component are require (in this case resin slabs) that it may be worth making the mould using a silicone to allow repeat casts and easy cast removal. As this project was very much ‘try it and see’ the required moulds were made as needed.
Once the basic mould was complete the surfaces were coated with a barrier coat of Vaseline to prevent the resin penetrating the surface of the MDF when poured.
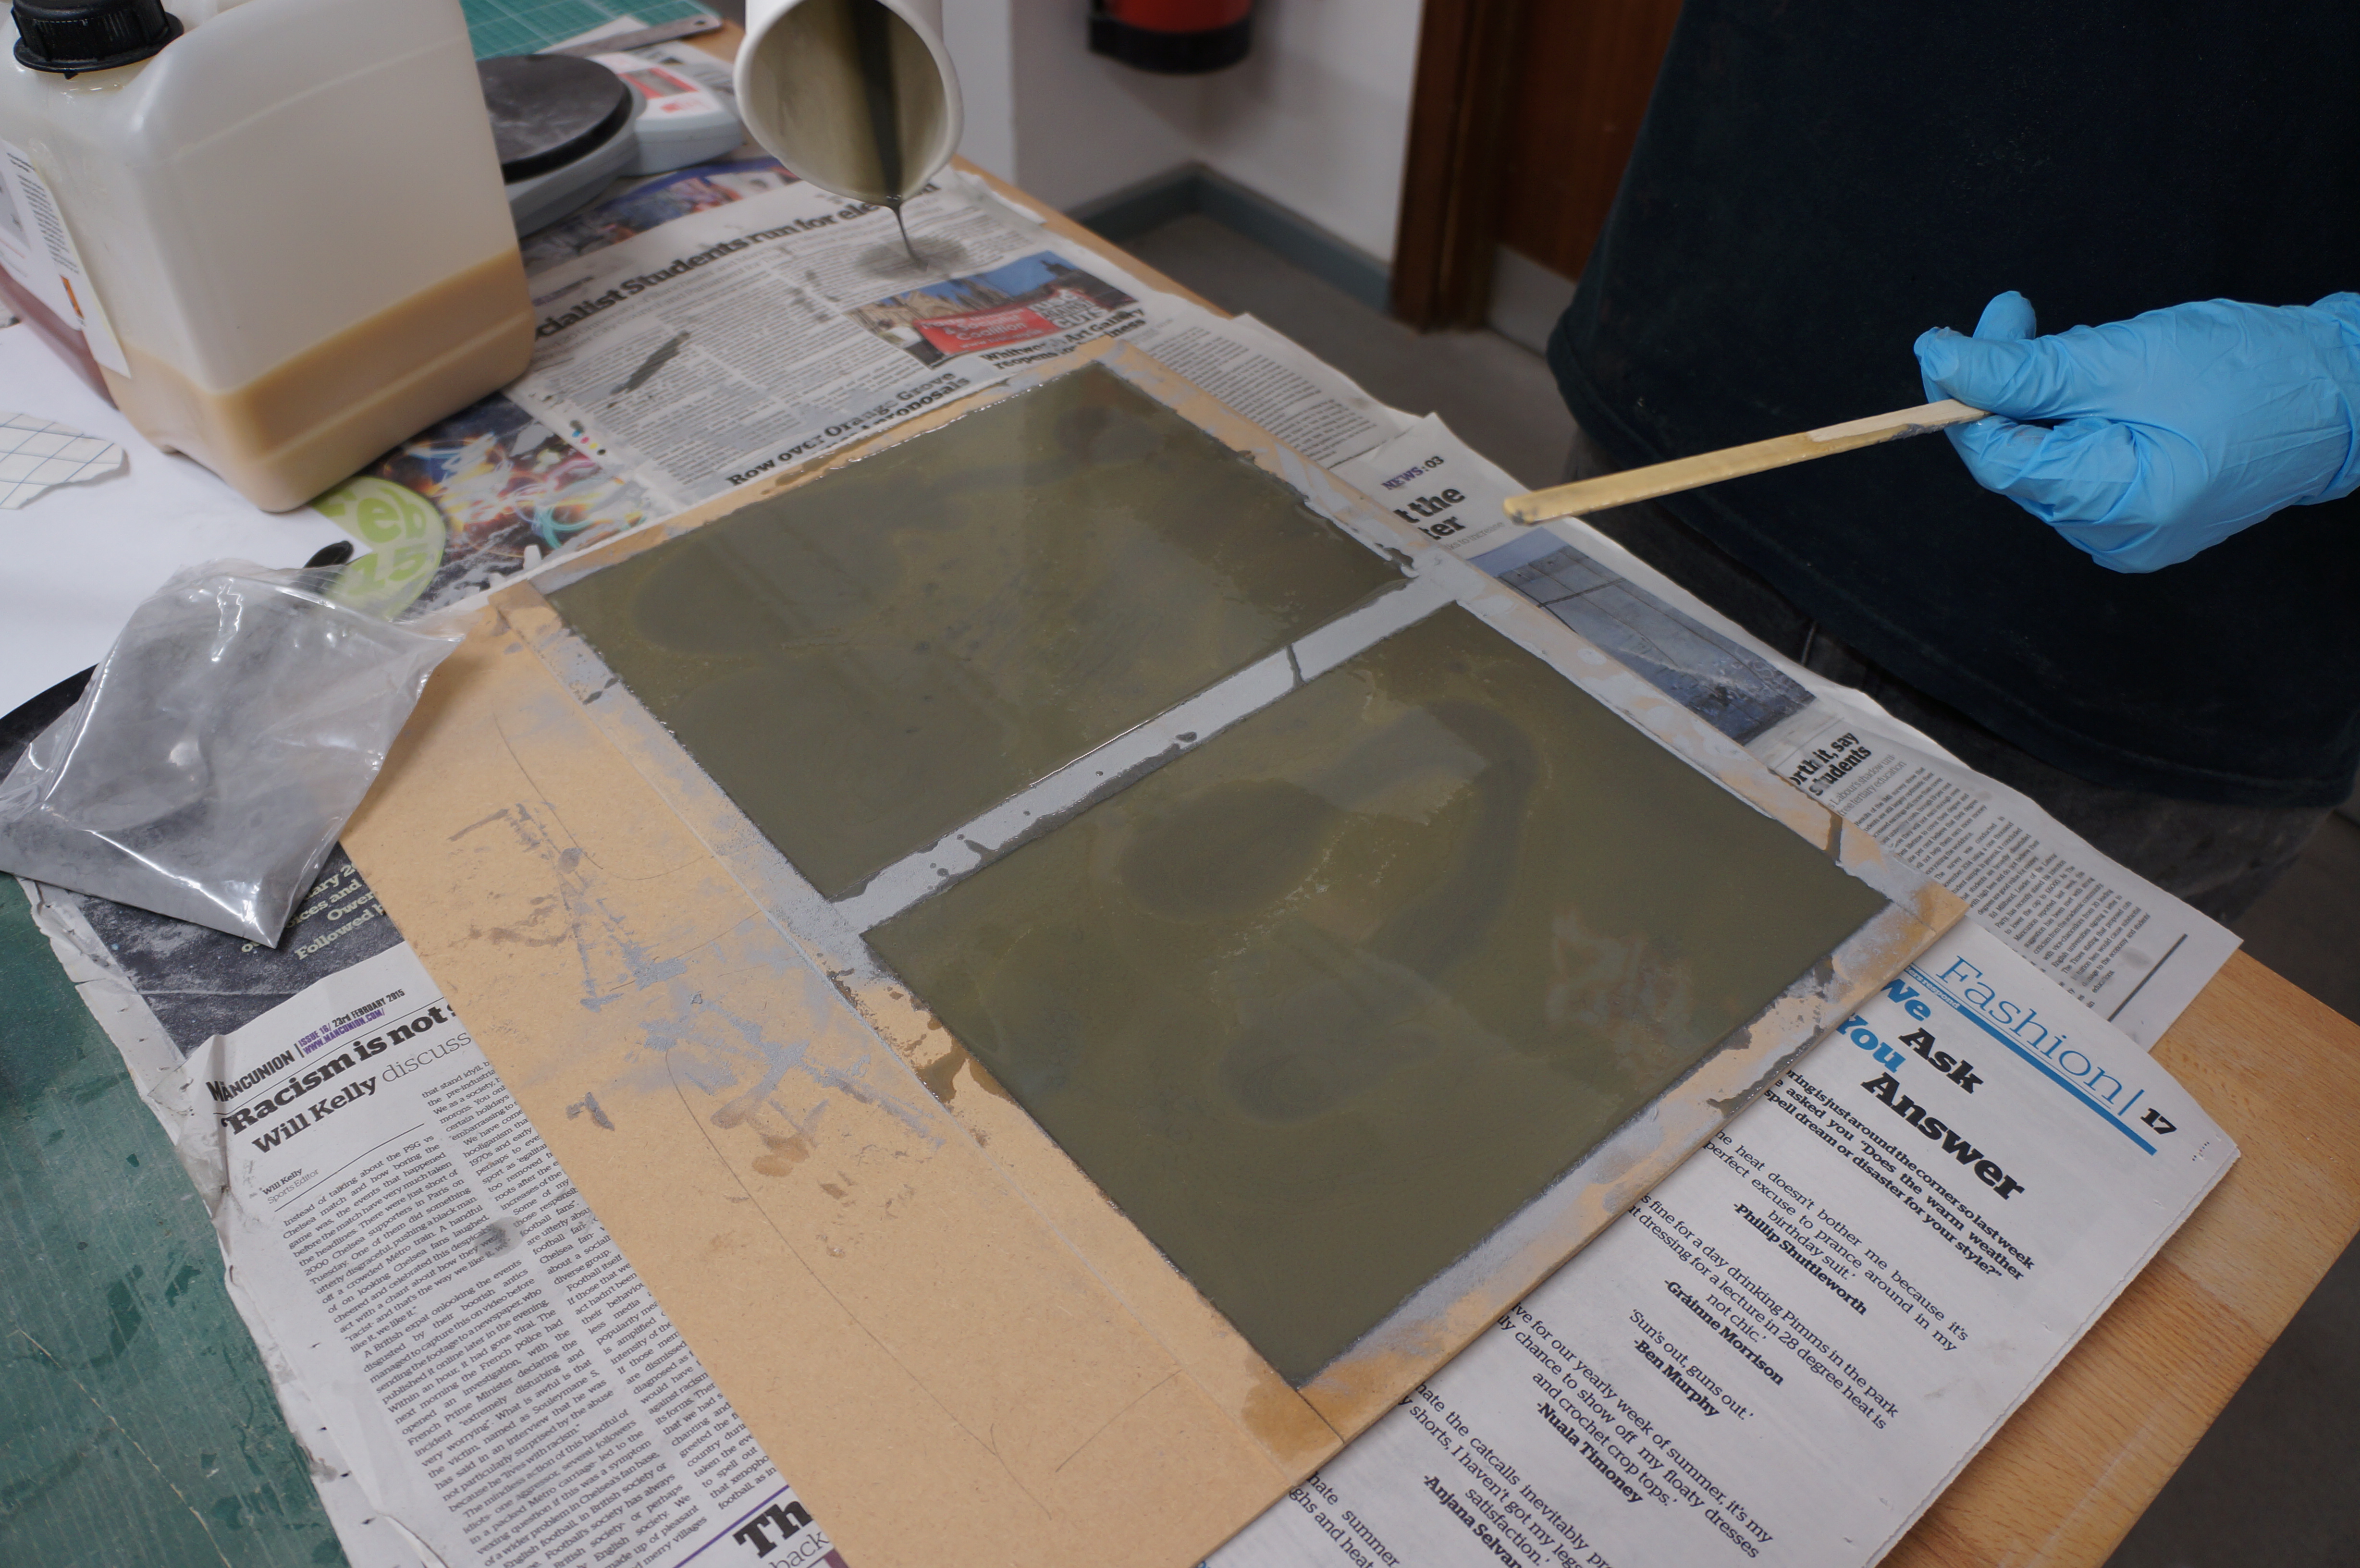
Metal powders
The use of metal powders in casting allows us to create a lightweight and, when compared to full metal casting, low cost but effective substitute material. The process uses very fine metal powder to coat the surface of a desired cast that can then be polished as if it were cast in the metal in use. In this case Aluminium powder was chosen to emulate lead.
 In order to guarantee a good coat of metal powder on the surface of casts the mould should be dusted with the desired powder. The excess powder can be poured from the mould and reused.
Mixing/Pouring Resin
For ease and speed of casting fast-cast- polyurethane resin was used as the stock material for the cast slabs. The resin is usually mixed at a 50/50 ratio but always check the instructions as some brands do vary their instructions on ratio mixing. As we were going for a metallic finish overall metal powder was also mixed into the resin to back up the surface coat already ducted into the mould. As the resin is poured the metal powder particles naturally want to sink to the lowest point so having them in the resin only increases or chances of a successful finish on the face of the cast.

Surface Finishing and Laser Engraving
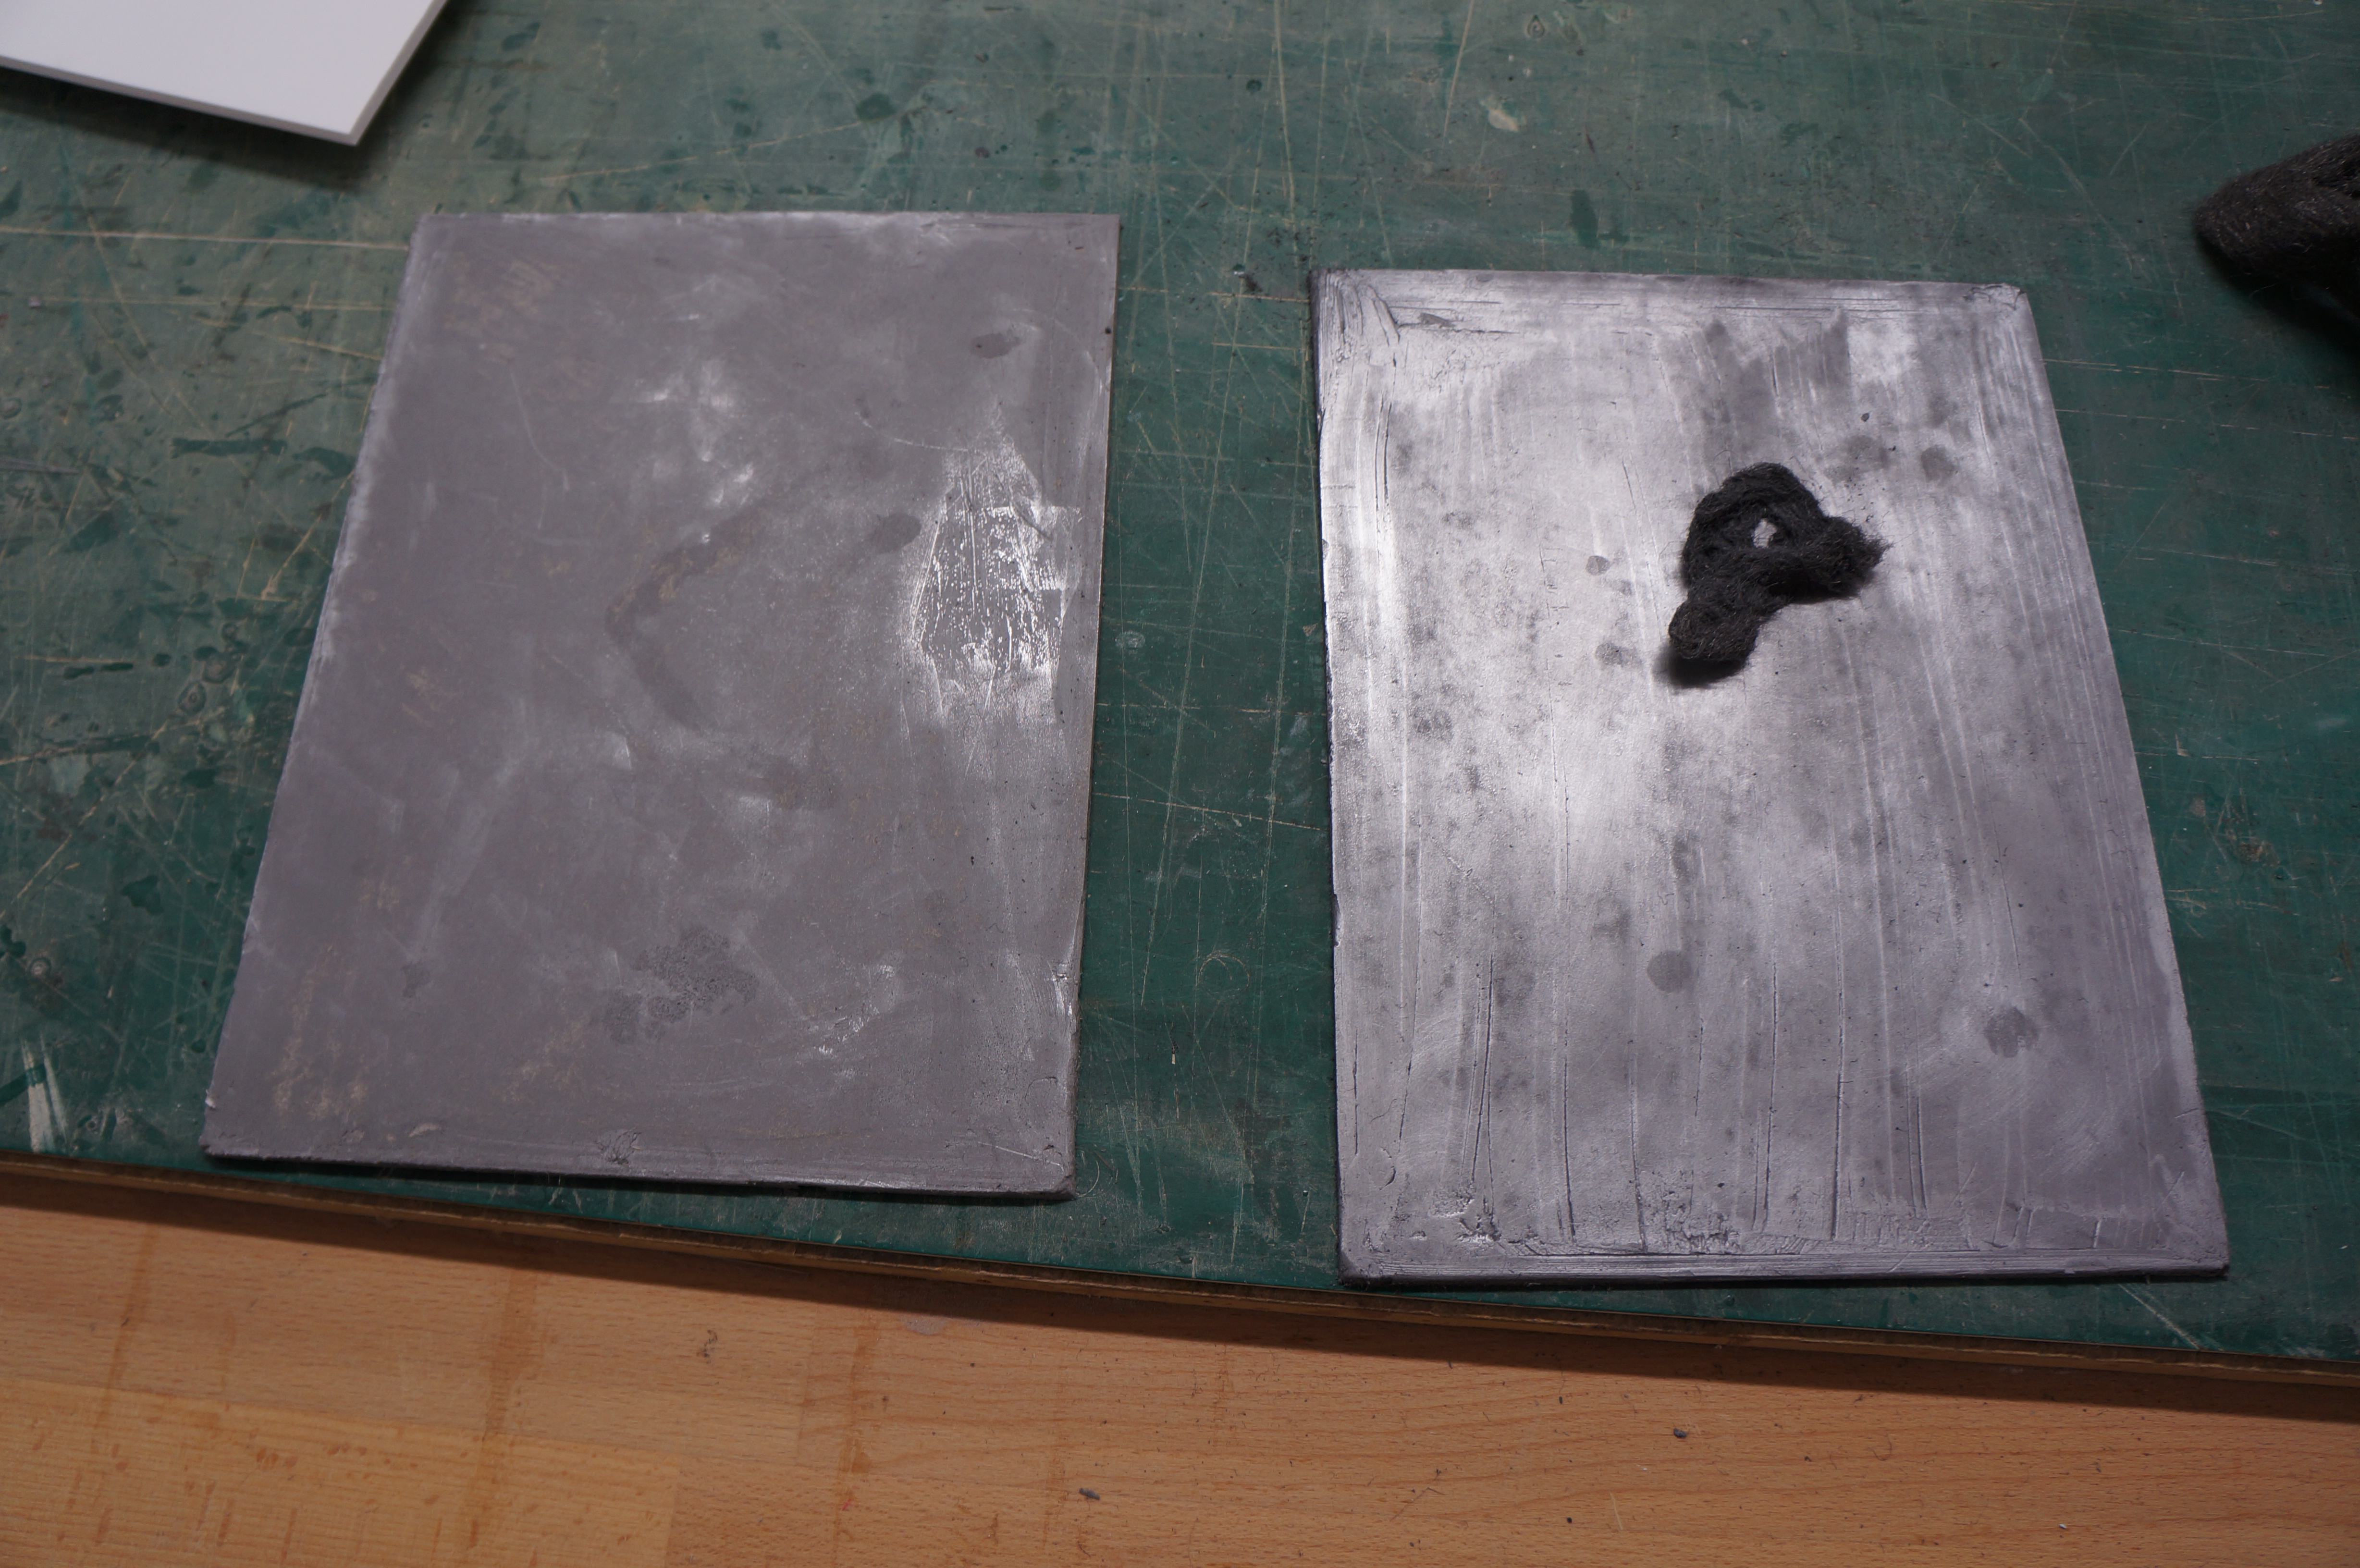
Once the slabs have poured they can be carefully removed from the mould and all being well will have a dull but flat finish on the down face. Using wire wool the surface can be polished up to the desired shine.
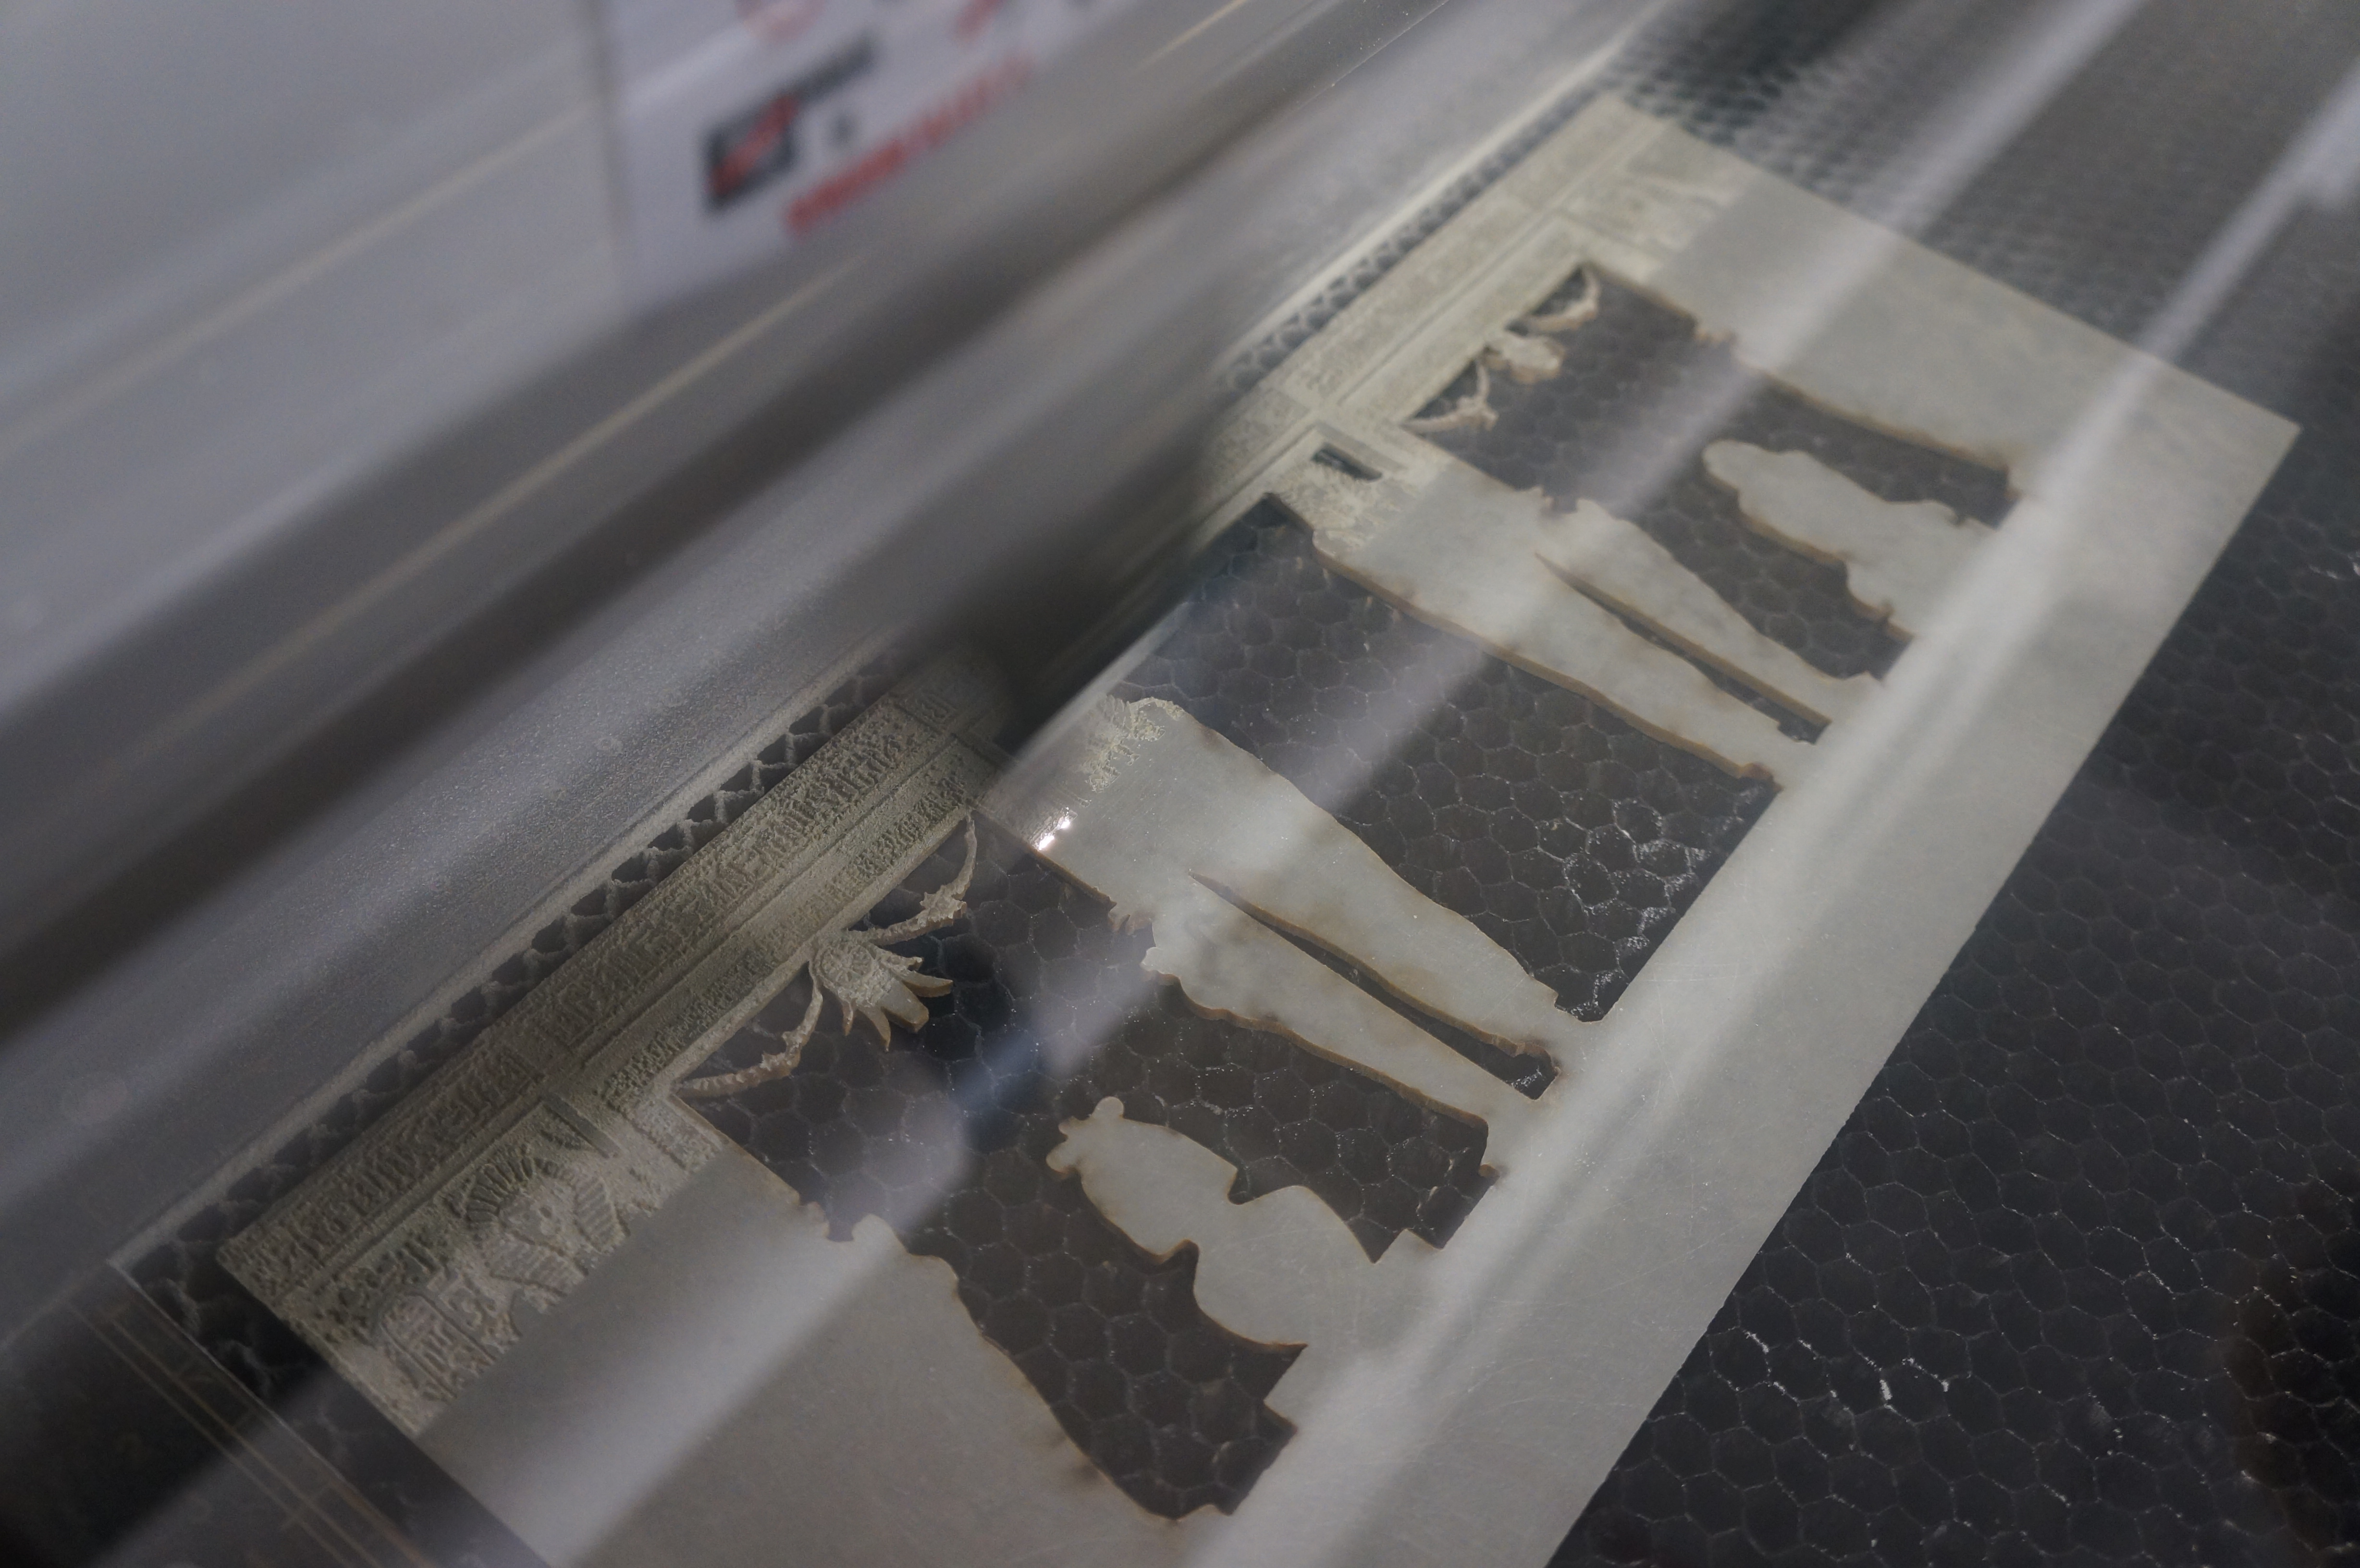
Next up for this project was the engraving of the Piranesi drawings onto the plates. Using the laser cutters Daniel and Vanessa were able to engrave into the polished surface of the plates as well as the back face which would end up being inside the model.


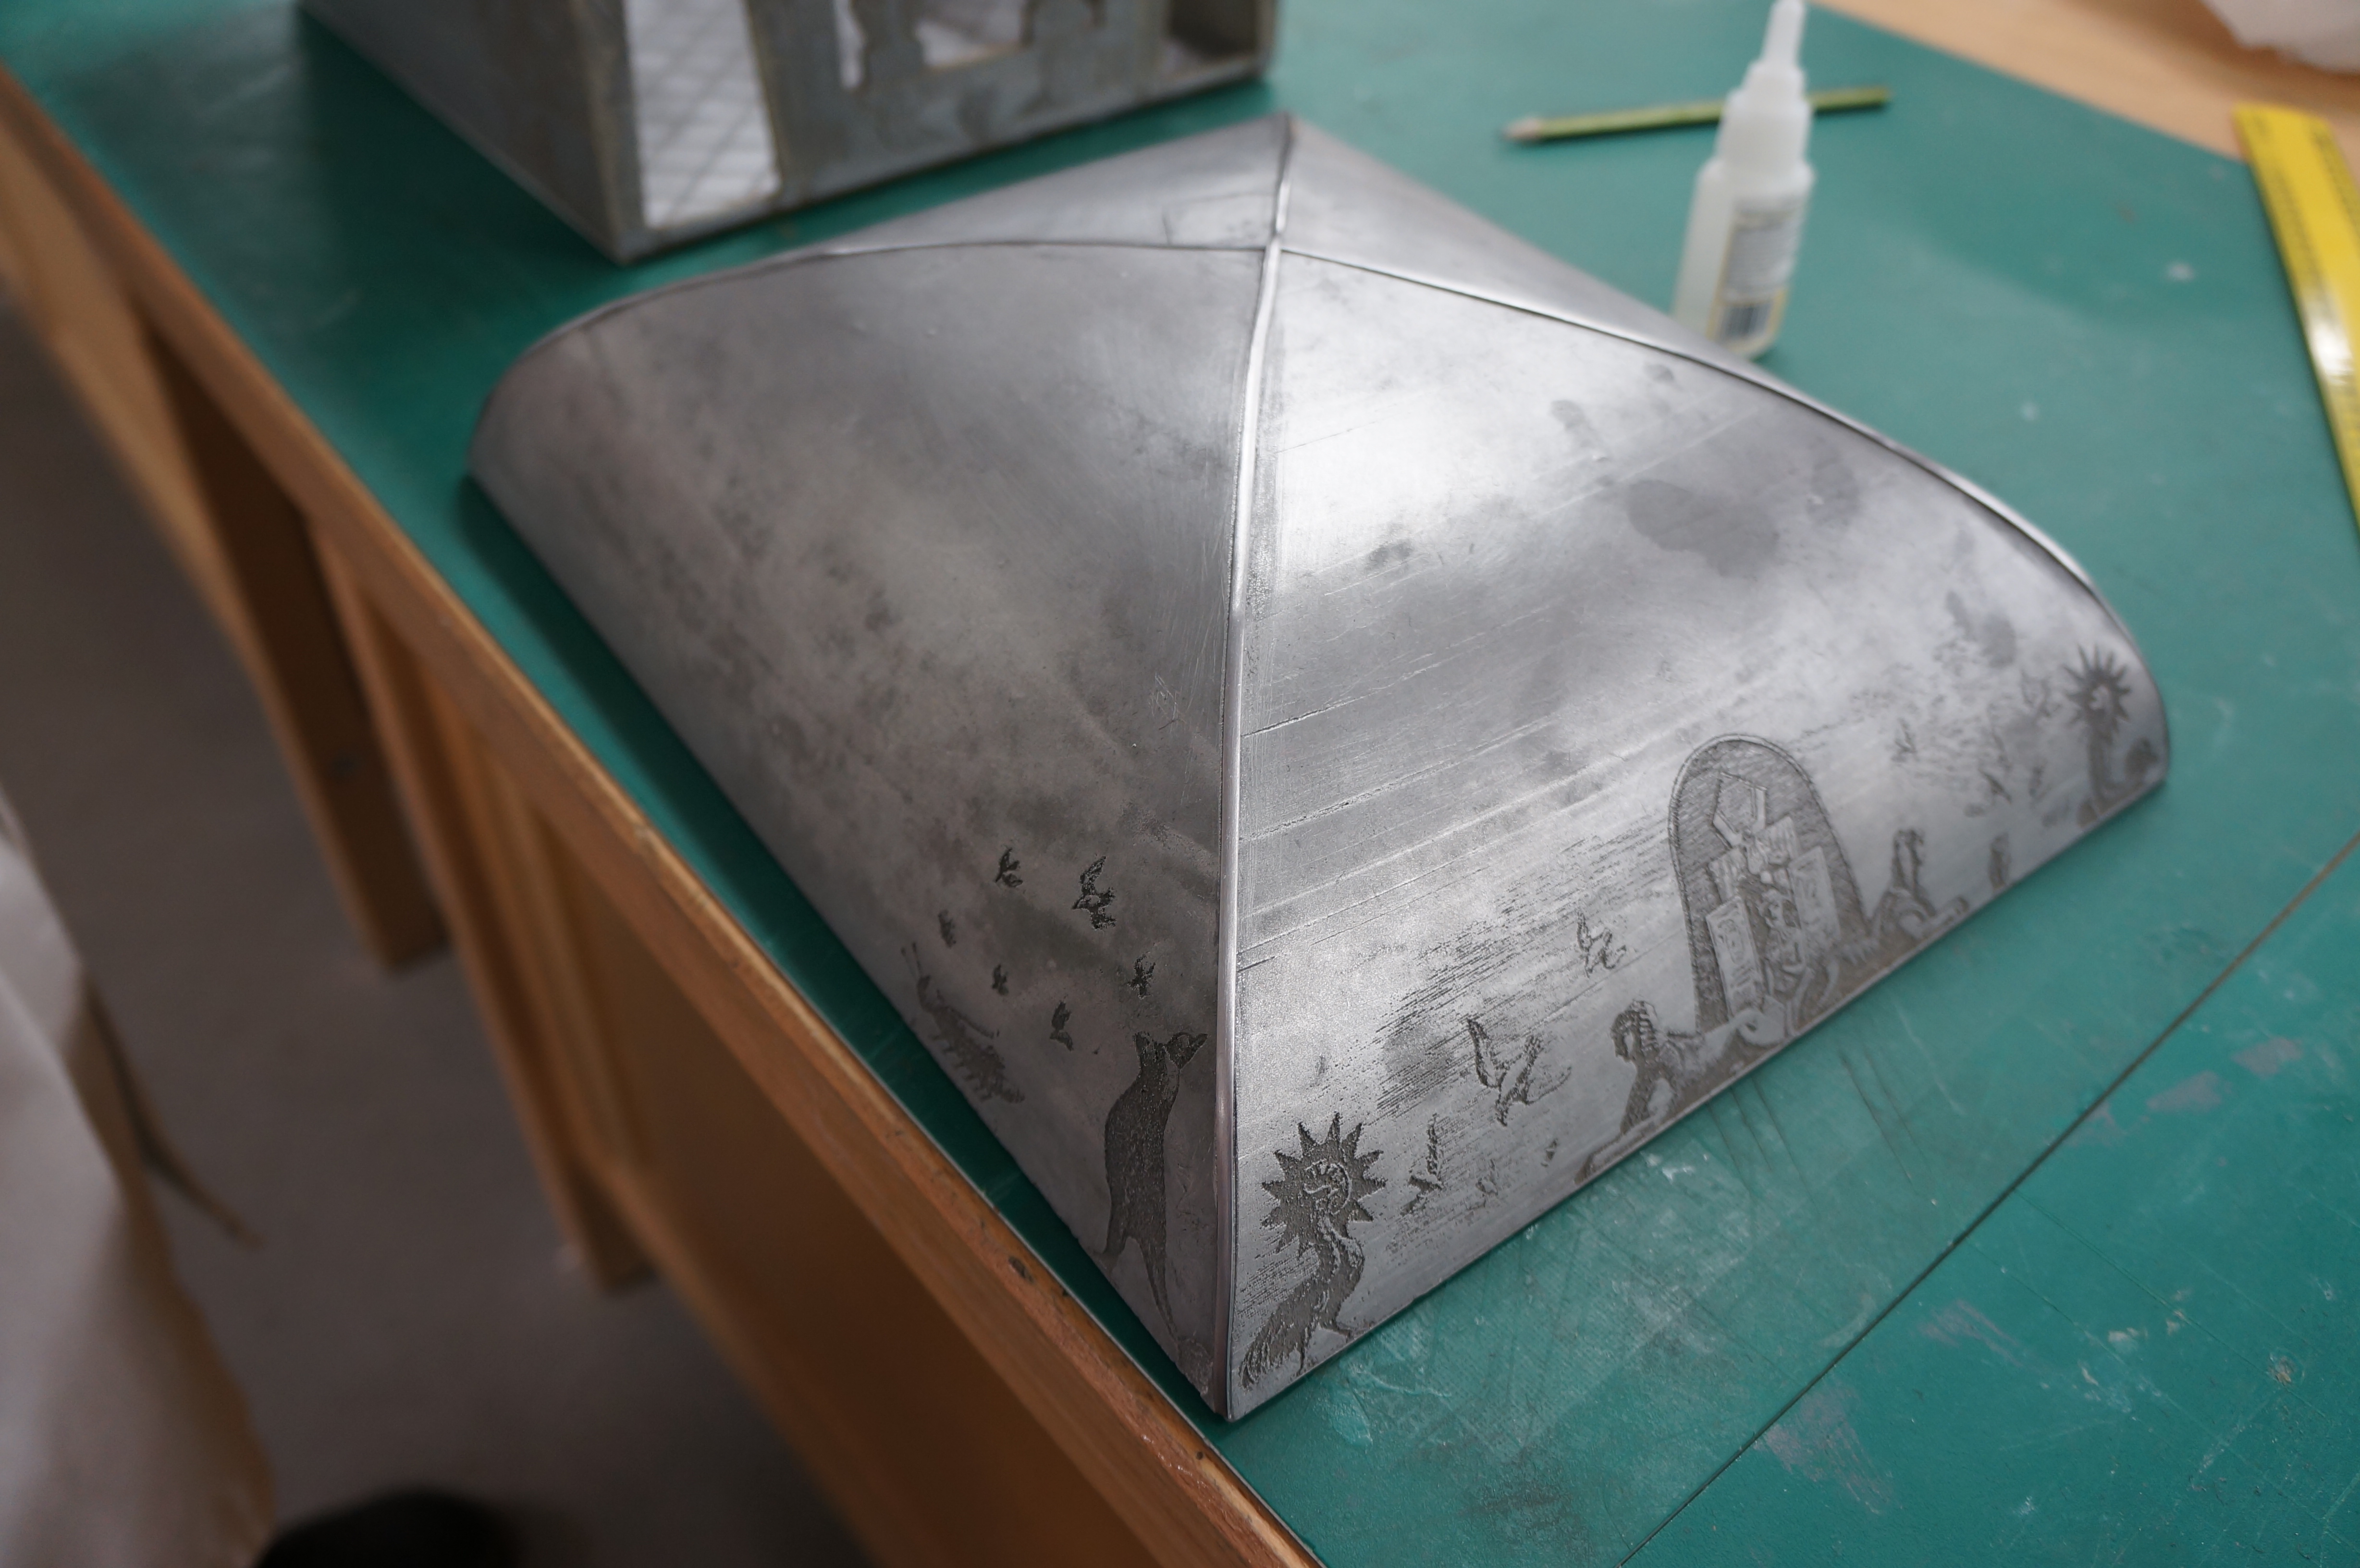
The roof components required heat forming to create its vaulted shape. This shaping occurred after being engraved and cut to shape which required significant time to figure out correctly.
 The final detail to be added to the model was lead finishing strip as used on leaded windows. As well as finishing the panel gaps this strip. lent itself to the model design and matched the metallic finish perfectly.
 The model will be on display as part of the 5th year ‘Lost Spaces’ workshop display at the end of year show in June.